Best Practices for Weatherizing Low-Rise Multifamily Projects
Effective Techniques are Critical for Keeping Out Air and Moisture
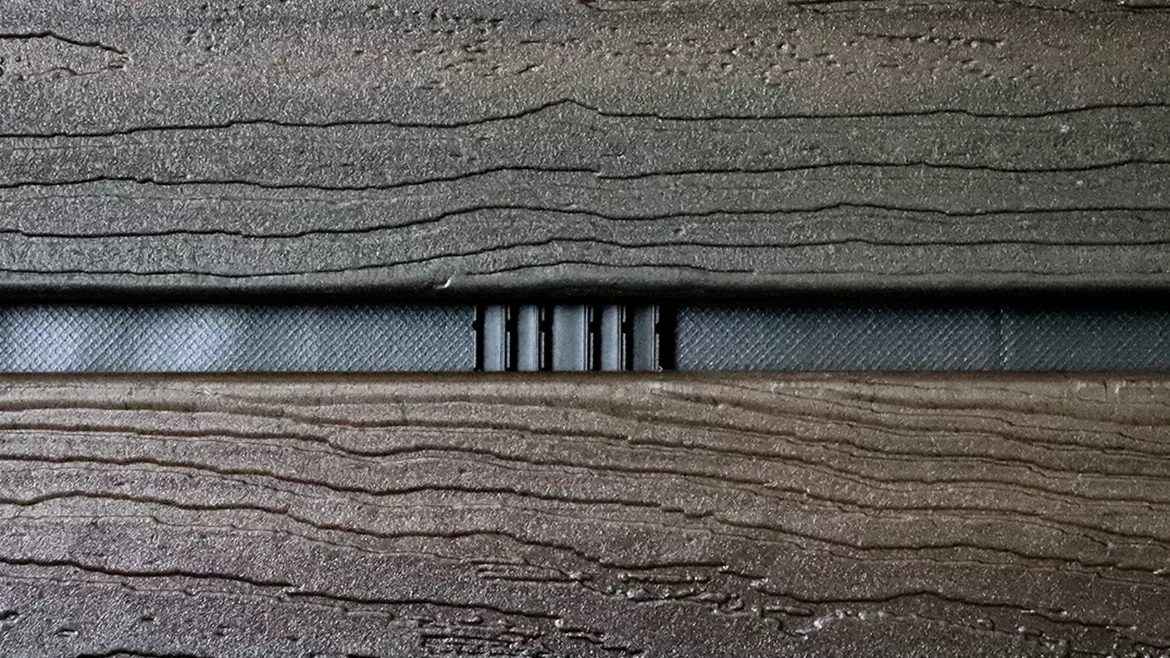
Open-joint cladding application.
Photos courtesy of Benjamin Obdyke.
Building scientists and other experts agree that no matter how tightly a building is constructed, moisture will always find a way into the building enclosure. Moisture infiltration can undermine structural integrity, cause exterior surfaces to deteriorate, and shorten life of paints and stains. It can also foster mold and rot that not only cause structural damage but also pose serious health hazards.
Low-rise multifamily projects offers similarities to both single-family homes as well as to commercial buildings. In square footage and surface area, low-rise buildings have a lot in common with larger multifamily and commercial projects, while their wood framing and sheathing, windows, and outdoor spaces run akin to traditional detached homes. In either case, effective weatherization techniques are critical to keeping out air and moisture to preserve longevity, ensure energy efficiency, and promote indoor air quality.
Here are a few best practices to keep in mind to protect low-rise multifamily buildings.
1. Hold Pre-Construction Meetings

A self-adhered drainable housewrap provides a pathway for moisture to drain away and can serve as an air control layer as well as a moisture control layer.
Large projects mean different crews or companies may be working on different sections of the building envelope, whether due to length of project time or simply crew scheduling. The building planner must focus on upfront communication, holding pre-construction meetings with representatives from all involved subcontractors that clearly explain the products being used and where, how they work together, and the required sequencing and installation of each.
2. Create Wall Mockups
As part of pre-construction and ongoing communication with installers, create mockups of the wall sections. A moveable, 4x8 mockup can show transitions starting from the foundation, proper sequencing of the weather resistive barrier (WRB) and flashing, and proper integration of windows and doors, flashing, drip edges, siding and trim, and penetrations like pipes and outlets.
Educate installers using the mockup, and be sure to teach new crews and crew members when they come on board. A mockup should travel with the crew as they move around the building so they can verify that what they’re installing matches.
3. Understand Warranty Requirements

Products with longer UV exposure times are an ideal option for multifamily projects or any low-rise project with open-joint cladding.
Depending on the manufacturer, a warranty exception or registration process may have to be created prior to construction. It will need to record the installation process, products used, etc. to get a multifamily warranty to go with it.
4. Take a Systems Approach
It doesn’t take much to lessen the integrity of a wall system—issues as small as an unsealed hole for a cable line, an improperly layered area of housewrap, or a tightly nailed siding panel can affect how far and how easily moisture and air can penetrate. Thinking of walls as a system requires considering its layers—how to maintain continuity of those layers as you move from one area to another so that moisture and air follow the right paths scientifically proven to protect the structure.
Some of the common ways problems are introduced include layering windows and weather barriers improperly so that water gets trapped, putting holes into the layers without properly detailing the gaps left behind, and not properly transitioning from the walls to the roof to maintain moisture barriers and drainage paths.
Ensuring all of the envelope’s layers work together effectively starts with the design stage; work with manufacturer partners to design wall and roof systems that leverage building science-based practices to ensure the home is tight yet breathable and has proper paths for trapped moisture to escape.
Other considerations when taking an integrated approach to the envelope include:
Consider all influencing factors: When designing the envelope, climate will be the biggest factor. Account not only for climate zone but also typical rain levels, wetting seasons, and temperature ranges. Occupancy is the second-biggest influence: How will the occupancy levels and the building’s function impact moisture and thermal loads coming from inside the building? It’s also important to educate building managers and tenants on properly using systems, such as mechanical ventilation, to ensure the building envelope can work as designed.
Get clarity on team responsibilities: It’s up to every trade working on the envelope to understand their role in maintaining the continuity of the layers and to understand how their areas intersect with others; for example, an electrician shouldn’t be drilling a hole through the WRB without properly sealing or notifying the general contractor. This is where the aforementioned pre-construction meetings and mockups can be hugely beneficial.
Understand material compatibility: Each crew needs to understand how their materials interact with others and determine ahead of time if adjustments should be made. For instance, an asphalt adhesive used by the flashing installer may break apart the plastic on a window’s flexible nailing fins over time, leading to failure.
Pay close attention to wall and roof intersections: Transitions are always the biggest culprit in failures, and the roof and wall transition is one of the biggest. Ensure the roofing and siding crews communicate on the order of layers to ensure proper moisture drainage as well as to ensure compatibility between materials.
5. Don’t Skimp on Budget
With projects this large, it’s tempting to allocate more money toward visible features, such as upscale countertops or fixtures. But going cheap on behind-the-walls products or forgoing “added” expenses such as rainscreens can lead to degradation and costly fixes—and potential liability—down the road that can negate any upfront savings.
6. Upgrade Products
Indeed, investing upfront includes choosing products that do more and protect better—and often can save money or hassle. For example, opting for a self-adhered weather resistive barrier is more of a premium than a mechanically installed housewrap, but a self-adhered wrap can act as an air control layer as well as a moisture control layer. This is particularly helpful for the growing number of multifamily projects seeking Passive House certification.
7. Consider UV Exposure:
One challenge with projects this large is the potential for prolonged UV exposure. If the weather resistive barrier is going to be left exposed, ensure you understand the product’s UV allowances. Long-term UV exposure can break down the protective control layer of a weather resistive barrier, which means the WRB won’t perform as it’s designed, possibly compromising the building’s water holdout and failing prematurely. Leaving the housewrap exposed for too long also may void the product’s warranty.
It may be easiest to select a product that offers longer UV exposure time to eliminate any potential issues.
8. Understand the Added Requirements of Open-Joint Cladding
UV exposure is also a consideration if your project uses open-joint cladding. For these installations, the wider space between the boards subjects the interior of the wall system to increased exposure to UV rays and moisture. A UV-resistant black housewrap can protect against long-term exposure while also creating the desired shadow lines of the open-joint-siding look.
Along with UV rays, open-joint systems also are more vulnerable to moisture, as more air and water can get past the primary cladding than with most traditional siding installation methods. A self-adhered, UV-resistant weather barrier will eliminate extra penetrations that may allow in moisture. If mechanically installed housewrap is used, opt for cap fasteners that will better block water from getting behind the WRB; ideally in this type of installation, cap fasteners should be installed behind the furring strips. Taping all seams in this type of assembly also is crucial.
9. Factor in the Nuances of Multi-Textured Facades
Combining different cladding materials and incorporating various projections, corners, and angles helps large multifamily projects look visually interesting—but also can create more complicated requirements for the wall system within. For example, if the first floor transitions from a veneered stone to fiber cement for the remaining two floors, the veneered stone will need a rainscreen system and then can transition to a drainable housewrap under the fiber cement. Make sure to plan the weatherization around these areas and transitions, and include those nuances in the pre-construction installation training and wall mockups.
Another significant potential failure point for multifamily properties is at decks and balconies, where moisture can wreak havoc (and even be catastrophic) if the area is not flashed properly. Make sure to pre-plan the installation sequencing of housewrap and flashing, and maintain quality control over your subcontractors.
10. Pay Close Attention to Flashing
Taller heights and a lack of large overhangs make multifamily walls more prone to water intrusion. Pay close attention to flashing details and installation sequencing to ensure moisture doesn’t infiltrate the wall system.
Choose quality materials: Don’t go cheap on flashing; materials that degrade will lead to moisture problems and rot. For instance, a liquid-applied flashing is a slightly higher cost but can better address difficult-to-flash areas that are most prone to problems, such as windows. Invest up front for long-term durability.
Follow manufacturer instructions: The makeup of flashing and housewrap materials can vary greatly from manufacturer to manufacturer as well as from product to product. It’s important to understand the nuances of installing each flashing brand and type—from pressure requirements to exposure limitations—to ensure performance and maintain warranties. This also includes checking for compatibility with other materials the product may come into contact with.
Avoid reverse overlaps: Proper sequencing with a shingle overlap at all intersections is one of the most critical steps to ensuring moisture flows down and away from the wall system. One problem area, for example, is where the roof and the wall meet.
Account for exterior insulation: For projects using exterior foam board insulation, the added thickness will affect your window flashing because the window may be sitting flush with the continuous insulation or may have a deeper recess. You’ll need to adjust the application of your housewrap and flashing accordingly.
Apply proper pressure: Many of today’s self-adhered flashings are designed to stick for a long time—but only if the installer applies proper pressure. Some adhesives require pressure activation, so be sure to follow manufacturer instructions.
A well-protected, high-performing building envelope starts with a systems approach at the design stage and continues with proper installation—with clear communication throughout. Along the way, be sure to seek out your manufacturer representatives for support and technical advice.
Looking for a reprint of this article?
From high-res PDFs to custom plaques, order your copy today!
.webp?height=740&t=1767036885&width=auto "Header - BE 1170x658 (002).png")

.webp?height=740&t=1755781744&width=auto "KEE(2).png")