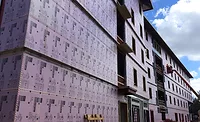
The Continuation of Continuous Insulation
It was a bold statement, but I said it; EIFS is the true continuous insulation, the system verifying the definition. But let me say this, it is not the only continuous insulation. For many years stucco has been applied over various forms of foams, most commonly EPS and XPS. A continuous insulation stucco assembly can be achieved with and runs a close second to the EIFS.
Stucco over foam isn’t new, and in fact, I have heard recounts of stucco application, done back in the 1950s, where stucco was applied directly over foam, with no lath, on large insulated cool rooms. From my own application recounts of applying stucco over foam, I can testify that stucco sticks readily to foam, more to EPS than XPS, but none the less, sticks. The reason I mention this is that there is a mental picture painted of stucco over foam being cantilevered from the wall assembly thus posing danger of falling off. This may cause pause when considering a CI assembly involving stucco. To address this we need to look at some assemblies.
Stucco Applied to Foam Over Framed Walls
Three Coat
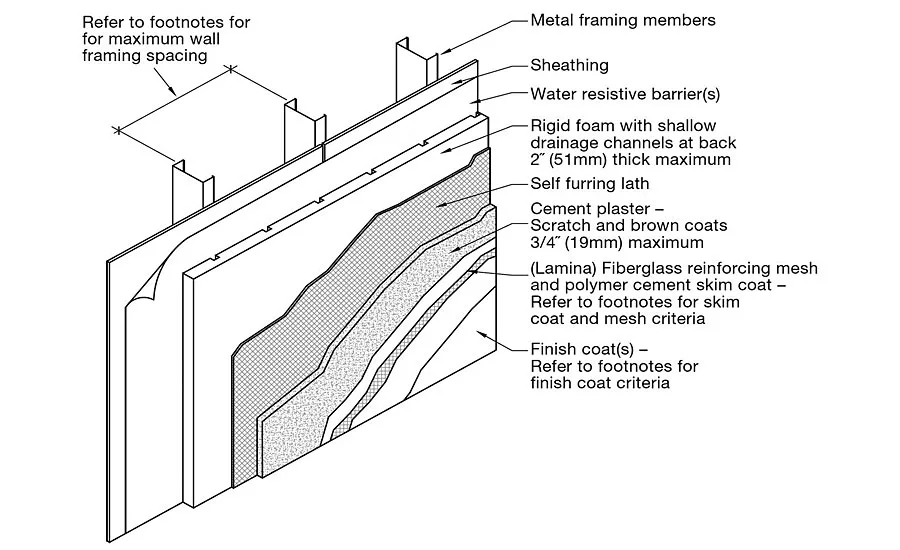
This is the assembly we did back in my mudslinging days. Pretty straight forward, the wall is erected and sheathed, WRB applied (two layers black paper) and the location of the studs transferred to the face of the WRB. We then put the foam sheets on with a few fasteners, and again transferred the stud locations to the face. Then we applied the lath and used long fasteners (spiraled with a cap) of sufficient length to hit the studs. We used a custom casing bead made to encapsulate the foam, and wire tied the control joints over continuous lath (expanded metal or stucco netting) and then applied the stucco. A little more time was spent lathing because of the time it took to ensure proper transfer of the stud location to the face of foam. Not a glamorously engineered assembly but effective, and the projects I worked on are still standing to this day. The stucco cracked a bit more when applied over XPS vs. EPS, and being the smartest group of plasterers we knew, we concluded this was due to the stucco sticking better to EPS than XPS.
One Coat
As you read this, hundreds of homes are being applied stucco with one coat, over foam, over open frame. Yep, open frame, no sheathing. It is a very good cladding that performs really well when done right of course. For the one coat assemblies, success is directly related to proper thickness (we always put on ½-inch), hard floating (never sponge floated) and proper moist curing (worth repeating; proper moist curing). In a cutaway view the assembly starts with the framing and two layers of WRB attached directly to the framing members. In these non-sheathed assemblies the WRB is usually a building wrap vs. black paper, with black paper being the most common when the exterior is sheathed. The foam is usually 1-inch tongue and groove with a dimpled face. More often than not the lath is 1-inch 20 gauge stucco netting. The stucco brown coat is applied in a single coat and then like three coat, the assembly is finished with colored stucco, acrylic finish or cement texture and paint.
EPS and Lamina Applied Over Stucco
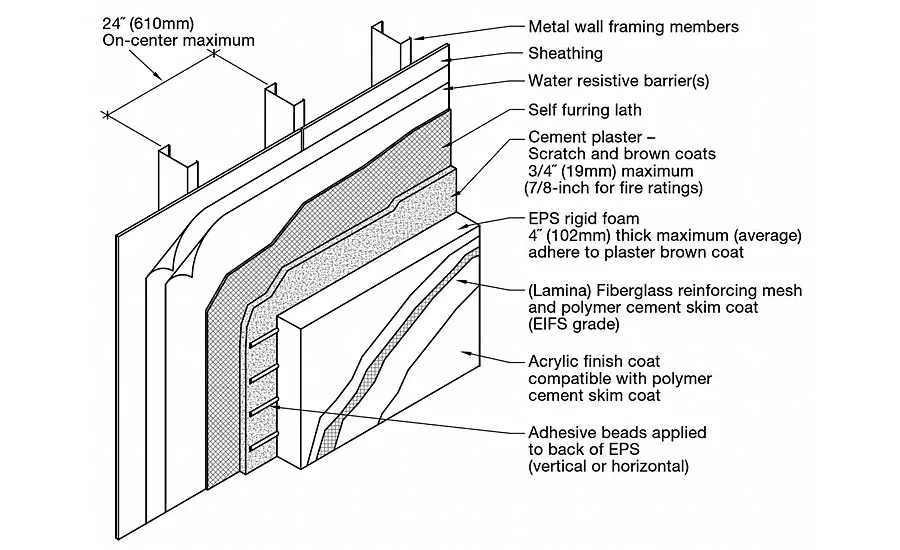
This assembly begins with a conventional three coat stucco application, sans finish. The stucco should be wet cured but does not need to be floated because the CI assembly is applied over the stucco. Notice I did not say an EIF system is applied? Even though foam, mesh and base coat, and acrylic finish are used, this is more of a thermal assembly of insulation and components to protect the insulation. There is no code requirement to use an EIF system. Think of it as an insulating layer sandwiched between a code compliant stucco assembly and a finish layer. Easy, my EIFS professionals, I mean no harm. This came about during the rough and tumble EIFS years when EIFS was taboo but foam and some protective layers weren’t—I shake my head as I type this. So in overview we have a stucco cladding with some foam and a lamina to cover the foam and an acrylic finish, CI stucco version two.
Stucco Over Foam between Z Furring
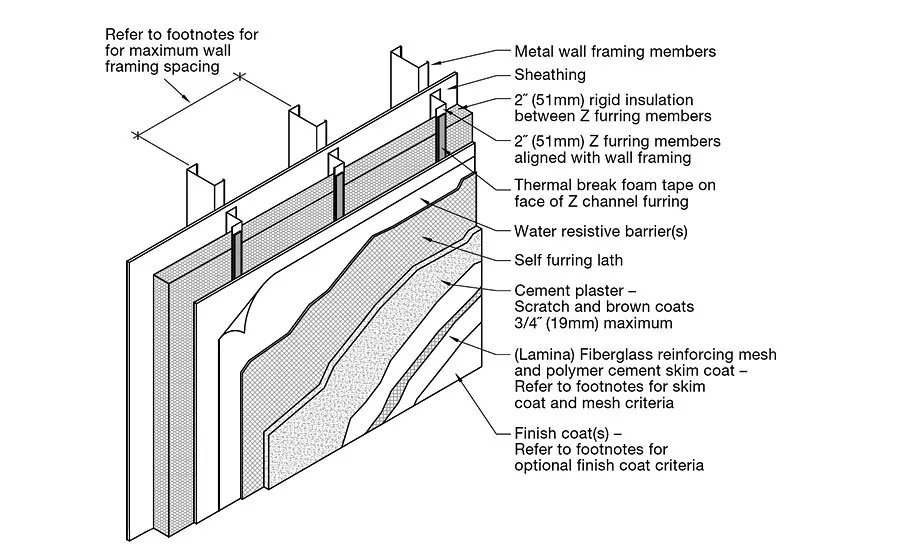
This is another version of a CI assembly where Z shaped furring members are fastened to the studs of a sheathed wall assembly. The foam is sandwiched between the Z furring (vertically or horizontally placed) and a second sheathing layer is attached to the face of the Z’s. One may argue that the Z’s act as thermal bridges and they would be right. Unless the front edge of the Z is thermally broken from the sheathing, bridging can occur. After the sheathing is applied, a three coat stucco assembly is attached to the front flange of the Z. The WRB is at the second sheathing layer instead of behind the foam like it is in the other two examples. This assembly is a little less effective as a CI assembly but is used commonly.
CI Stucco Systems
These are proprietary systems (not assemblies) that incorporate a foam layer under a three coat stucco cladding. One version uses a series of engineered metal components fastened to the sheathed wall which sandwich the foam between them. The trims and wire lath are wire tied to these engineered pieces and the foam is never penetrated with fasteners. Others have similar engineered pieces and parts and are brand specific. I suggest one uses the Google to find these engineered systems.
Cantilevered Tales
I mentioned that some might have a mental picture of the fastening of a stucco assembly through the foam as a dangerous cantilevered condition. Here is the mental counter-picture. The foam is attached directly to a framing member and the shank of the fastener is held in place through intimate contact of the foam surrounding it. The stucco is applied directly to the face of foam, and as I mentioned earlier, sticks to it. So the stucco and lath layer is not on its own, out in space but rather is part of the whole cladding. In order for the cladding to sluff off or catastrophically fall off, the whole layer would have to shear at once. The only way for that to happen would be if all of the fasteners broke at once out on the face of the foam and the stucco un-stuck itself from the foam. So that is my layman’s approach to dispel the myth of cantilevering. But, there are others way smarter than me who actually did testing on this condition. Two that I know of are the Foam Sheathing Coalition who published: Tech Matters—Guide to Attaching; Exterior Wall Coverings through Foam Sheathing to Wood or Steel Wall Framing; and the industry gurus at buildingscience.com who published BA-1314: Cladding Attachment over Thick Exterior Insulating Sheathing.
CI and Stucco Cracks
It is true that when stucco is applied over foam there is a slight increase of the possibility of minor cracking. EPS and XPS are really stable components and as such don’t move much within themselves. It’s the stucco applied over this stable, thermally absorptive layer that moves at a different rate through thermal expansion and contraction, that allows for the slight increase in cracking potential when compared to non-foam applications. A possible solution is to apply a lamina layer over the floated and cured stucco brown coat thus mitigating the cracking potential. I have recently seen a new lightweight mesh product that has a tri-dimensional weave to it and is designed for incorporation into the actual brown coat or as a lamina component when embedded in an acrylic modified base coat and applied on top of the brown coat.
Continuous Insulation is not going away, and in fact, is almost the norm now. I have illustrated a few stucco assemblies that comply with the code requirements but have not covered all of the possibilities. There are some new ways to build an insulated stucco assembly, a couple of which I have recently been introduced. When considering an assembly or system that incorporates continuous insulation remember these very basic rules of importance; first keep out the moisture, then address the insulation, then make it pretty.
In my Walls & Ceilings article, “Lots of Lath” (December 2015), I referenced glass fiber lath and stated that “ASTM does not publish a report on this lath and each manufacturer must have an ESR report.” Thanks to my fellow industry warrior Bill Egan, I now understand that ASTM in fact does have testing for the non-metallic lath products. Thank you, Bill.
Looking for a reprint of this article?
From high-res PDFs to custom plaques, order your copy today!
.webp?height=740&t=1767036885&width=auto "Header - BE 1170x658 (002).png")

.webp?height=740&t=1755781744&width=auto "KEE(2).png")