Building Enclosure logo
search
cart
facebook twitter linkedin youtube instagram Spotify Podcasts Apple Podcasts Spotify Podcasts Apple Podcasts
  • Sign In
  • Create Account
  • Sign Out
  • My Account
Building Enclosure logo
  • NEWS
    • Breaking News
  • SECTIONS
    • Columns
    • Project Profiles
    • Trade Shows
    • Sponsor Insights
  • SYSTEM DESIGNS
    • Low-Slope Roofs
    • Pitched Roofs
    • Metal Roofing Materials
    • Waterproofing
    • Sustainability
    • Insulation
    • Exterior Claddings
    • Wall Systems
    • Building Envelope
  • BLOG
    • The BE Blog
  • MEDIA
    • Podcasts
    • Webinars
    • Quiz
    • Videos
    • Polls
    • Interactive Spotlights
    • Newsletter
    • Photo Galleries
  • DIRECTORIES
    • Directory: Blue Book
    • Directory: Roofing Resource
  • PRODUCTS
  • TECHNICAL
    • Codes
      • Waterproofing
      • Roofing
    • Details
      • Waterproofing
      • Roofing
  • CONTINUING ED
  • ABOUT
    • Advertise
      • Editorial Calendar
    • Contact
    • eMag Archive Issues
  • SIGN UP!
Details

Details: Roof Design: Perimeter Edge Flashing

Roofing Details
Composition: Wendy Zaremba-Just | Background Image: Alex Potemkin/ iStock / Getty Images Plus / via Getty Images
February 9, 2006


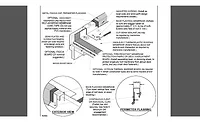
The design of flashing details at the perimeter edges that do not have walls, parapets or other vertical surfaces requires diligence. A study conducted by Factory Mutual indicated that of 145 roof failures, 85 occurred due to inadequate perimeter flashings. The majority of roof failures caused by Hurricane Hugo began at the perimeter edge. When designing flashing at the perimeter edges, important criteria must be followed. A wood nailer must be secured to the structural deck at the perimeter edge of the building where the deck adjoins the outside wall.

The attachment of the wood nailer to a masonry wall should comply with Factory Mutual Data Sheet 1-49, which specifies that bolts be installed in the top edge of the wall to anchor the wood nailer. If the installation of a scupper or ventilation is required, the wood nailer can be slotted.

Wood nailers are secured parallel to the perimeter edge and the roof surface. They are also installed as a baseboard for installing the counter flashing. On structural metal decks, the wood nailer serves as a shield against any wind that may penetrate into the flutes under the insulation, causing uplift.

The installation of the tapered cant strip is necessary to raise the roof elevation at the flashing location. It is essential to elevate the flashing above the roof surface. The tapered cant strip must be secured to the wood nailer and should be positioned above the roof surface. If the tapered cant strip were positioned below the roof surface, the flashing would be vulnerable at the joints due to the possible ponding of water.

Metal Flashing

The most important aspect of the perimeter edge flashing is the use of metal flashing. At perimeter edge locations, the metal flashing is the distinctive attribute that determines the success or failure of the flashing because it shields the base flashing at the joints. A gravel stop is a proficient type of metal flashing used at the perimeter edge, performing these basic functions:

  • It serves as a barrier that prevents loose aggregate from rolling off the roof.
  • It is used as an edge termination for the membrane.
  • It serves as a rain shield.
  • It serves as top surface for the anchorage of the fascia strip.

The metal used for the gravel stop in these areas must be rigid, watertight at all end laps and connections, and flexible enough to withstand thermal and differential movement. If the roof designer intends to restrain the gravel stop from expansion and contraction, a thin-gauged metal should be fastened closely at approximately every 3 inches on center. In these cases, the recommendation is to use a 16-ounce copper, 24-gauge galvanized metal or 0.040-inch aluminum.

When the intention is to accommodate linear expansion and contraction of the gravel stop, a thicker 10-inch extruder section is required, and it should be fastened sparingly at approximately every 12 inches on center. In these applications, the fasteners should be staggered. The distinctive attribute in this type of situation is that the ends of the metal are left free to expand and contract. For this type of detail, it is recommended that the applied metals be fabricated from 22-gauge metal, 0.050-inch aluminum or 24-gauge stainless steel.

The gravel stop should always extend over the base flashing when it is installed at the perimeter edge to act as a shield over the flashing joints. The perimeter edge flashings that are not sloped or adequately shielded with proper metal tend to create the most problems.

It is also essential that a layer of plastic cement (for BUR or Modified Roofs) is applied over the membrane to isolate the gravel stop from the membrane. Sheet metal should never be directly applied over the roof membrane. The plastic cement will not only serve as an added waterproofing sealant, it will guard against the splits that often occur when the gravel stops are stripped in with the membrane. This detail is of extreme importance in the colder climates, such as in the North and Midwest, because this type of split is more prevalent in colder temperatures.

Share This Story

Looking for a reprint of this article?
From high-res PDFs to custom plaques, order your copy today!


Recommended Content

JOIN TODAY
to unlock your recommendations.

Already have an account? Sign In

  • bar graph shows LEED v4/LEED v5/LEED v6 in various colors

    When Will LEED v4 / v4.1 and LEED v5 Expire?

    The latest version of the LEED rating system, LEED v5, is...
    Sustainability
    By: Daniel Overbey
  • Celebrating Women In AEC-2026

    Celebrating Women in The AEC Industry Part 1

    A round-up of women in the design, engineering and...
    Building Envelope
    By: Lindsay Lewis
  • KEE membrane application on a roof

    A Beginner’s Guide to Single-Ply Roofing Membranes

    While PVC and TPO appear extremely similar, the chemistry...
    Low-Slope Roofs
    By: Peter Gross
Manage My Account
  • Sign up for the Newsletter
  • Online Registration
  • Manage My Preferences
  • Registration Customer Service

More Videos

Sponsored Content

Sponsored Content is a special paid section where industry companies provide high quality, objective, non-commercial content around topics of interest to the Building Enclosure audience. All Sponsored Content is supplied by the advertising company and any opinions expressed in this article are those of the author and not necessarily reflect the views of Building Enclosure or its parent company, BNP Media. Interested in participating in our Sponsored Content section? Contact your local rep!

close
  • HITT Construction headquarters
    Sponsored byBuilding Composites® LLC

    Pushing the Envelope

  • 2 construction workers and a DEXcell panel
    Sponsored byDEXcell Roof Boards

    Designing Low-Slope Roofs for Resilience

  • Bell Bank headquarters in Fargo, North Dakota
    Sponsored bySto Corp.

    Drained and Back-Ventilated Rainscreens vs Pressurized-Equalized Rainscreens

Popular Stories

graphic shows white arrows pointing to the right on a light green background

A Breakdown of Air Leakage Testing in LEED v5 BD+C

graphic shows a building destoryed by tornados with information on the amount of torandos in 2026 in the US

Record-Breaking Tornado Activity in Illinois Signals New Challenges for Architects

HITT Construction headquarters

Pushing the Envelope

Building Enclosure Newsletter

BE Poll

Events

April 9, 2026

Strategies for High-Performance Below-Grade Waterproofing

Credits: 1 AIA LU/HSW ; 1 IIBEC CEH; 0.1 IACET CEU

On-Demand Designing a high-performance building enclosure requires more than just surface-level protection; it demands a rigorous, performance-based mastery of below-grade water and gas mitigation. This discussion will provide an expert-level analysis of below-grade waterproofing within the comprehensive framework of the high-performance building enclosure.

April 28, 2026

Roof Design Considerations That Prevent Installation Failures and Change Orders

Credit: 1 AIA LU/HSW; 1 IIBEC CEH; 0.1 ICC CEU

On-Demand This course provides visual examples of actual field conditions. Some good, some not so good; along with design suggestions that can cut installation costs and reduce construction change orders. Upon completion of this course, you will have a better understanding of the requirements the roofing contractor must meet to provide the specified roofing system warranty, and long-term value to the owner.

View All Submit An Event

Products

Plaster and Drywall Assemblies Manual

Plaster and Drywall Assemblies Manual

This is a comprehensive manual that goes beyond codes and standards, providing expert guidance in design, detailing, material selection and troubleshooting for plaster and drywall.

See More Products

Related Articles

  • Perimeter Edge Flashing

    See More
  • Raised Perimeter Edge Roofing

    Roofing Detail: Raised Perimeter Edge with Fascia Cap Flashing

    See More
  • Roofing Details

    Roofing Detail: Draining Perimeter Edge

    See More

Events

View AllSubmit An Event
  • May 5, 2026

    Roof Design Enhancements to Optimize Roof System Performance

    Credits: 1 AIA LU/HSW approval pending; 1 IIBEC CEH; 0.1 ICC CEU On-Demand In this webinar, Mark S. Graham, NRCA's vice president, technical services, will review cost effective measures than can enhance and optimize roof system performance. Topics to be addressed include roof decks, air- and vapor retarders, insulation, roof coverings and roof maintenance.
  • April 28, 2026

    Roof Design Considerations That Prevent Installation Failures and Change Orders

    Credit: 1 AIA LU/HSW; 1 IIBEC CEH; 0.1 ICC CEU On-Demand This course provides visual examples of actual field conditions. Some good, some not so good; along with design suggestions that can cut installation costs and reduce construction change orders. Upon completion of this course, you will have a better understanding of the requirements the roofing contractor must meet to provide the specified roofing system warranty, and long-term value to the owner.
View AllSubmit An Event
×

Enhance your expertise with unparalleled insights.

Join thousands of building professionals today. Shouldn’t you know what they know?

SUBSCRIBE TODAY!
  • RESOURCES
    • Advertise
    • Contact Us
    • Store
    • Want More
  • SIGN UP TODAY
    • Create Account
    • Newsletter
    • Customer Service
    • Manage Preferences
  • SERVICES
    • Marketing Services
    • Reprints
    • Market Research
    • List Rental
    • Survey/Respondent Access
  • STAY CONNECTED
    • LinkedIn
    • Facebook
    • Instagram
    • YouTube
    • X
  • PRIVACY
    • PRIVACY POLICY
    • TERMS & CONDITIONS
    • DO NOT SELL MY PERSONAL INFORMATION
    • PRIVACY REQUEST
    • ACCESSIBILITY

Copyright ©2026. All Rights Reserved BNP Media, Inc. and BNP Media II, LLC.

Design, CMS, Hosting & Web Development :: ePublishing