Building Enclosure logo
search
cart
facebook twitter linkedin youtube instagram Spotify Podcasts Apple Podcasts Spotify Podcasts Apple Podcasts
  • Sign In
  • Create Account
  • Sign Out
  • My Account
Building Enclosure logo
  • NEWS
    • Breaking News
  • SECTIONS
    • Columns
    • Project Profiles
    • Trade Shows
    • Sponsor Insights
  • SYSTEM DESIGNS
    • Low-Slope Roofs
    • Pitched Roofs
    • Metal Roofing Materials
    • Waterproofing
    • Sustainability
    • Insulation
    • Exterior Claddings
    • Wall Systems
    • Building Envelope
  • BLOG
    • The BE Blog
  • MEDIA
    • Podcasts
    • Webinars
    • Quiz
    • Videos
    • Polls
    • Interactive Spotlights
    • Newsletter
    • Photo Galleries
  • DIRECTORIES
    • Directory: Blue Book
    • Directory: Roofing Resource
  • PRODUCTS
  • TECHNICAL
    • Codes
      • Waterproofing
      • Roofing
    • Details
      • Waterproofing
      • Roofing
  • CONTINUING ED
  • ABOUT
    • Advertise
      • Editorial Calendar
    • Contact
    • eMag Archive Issues
  • SIGN UP!
DetailsRoofing Details

Roofing Detail: Tie-Ins at Curbs

Roofing Details
Composition: Wendy Zaremba-Just | Background Image: Alex Potemkin/ iStock / Getty Images Plus / via Getty Images
January 11, 2012

Properly tying roofing materials in at curbed transitions is an important application method. This detail is often encountered at area dividers, firewalls, and expansion joints. It is required when one section of roofing is being completed and the adjoining area is not being worked on.

The flashing application in the completed roof area should be in accordance with the manufacturers requirements using the manufacturers approved materials. The point of contention is the tie-in point at the opposite end of the curbed transition. Application varies based on the covering material. If a metal cover is applied over the curb, most manufacturers allow their material to be applied to the top of the curb and terminated.

If there is no metal covering, the best practice is to apply (fully adhere) the new flashing over the top horizontal point of the curbed material. The existing flashing material can then be set over the new flashing down the face of the curb at the existing roof area.

In remedial construction it is best not to disturb the existing flashing in the area that is not being replaced unless maintenance or repair work is required. Please note the manufacturers typically only warrant their materials to the top of the flashing. However, most leaks occur at the horizontal top of the curb so it is essential proper waterproofing is applied at this point.
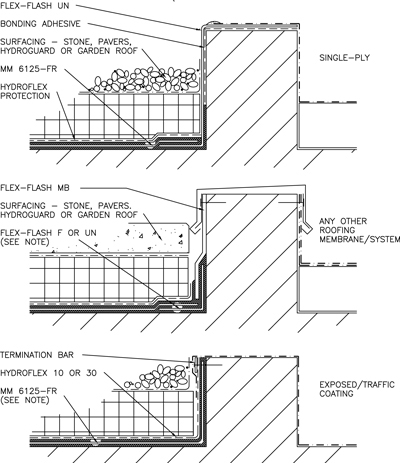
 

Tie Ins at Curbs roofing detail

KEYWORDS: flashing joints

Share This Story

Looking for a reprint of this article?
From high-res PDFs to custom plaques, order your copy today!


Recommended Content

JOIN TODAY
to unlock your recommendations.

Already have an account? Sign In

  • bar graph shows LEED v4/LEED v5/LEED v6 in various colors

    When Will LEED v4 / v4.1 and LEED v5 Expire?

    The latest version of the LEED rating system, LEED v5, is...
    Sustainability
    By: Daniel Overbey
  • Celebrating Women In AEC-2026

    Celebrating Women in The AEC Industry Part 1

    A round-up of women in the design, engineering and...
    Sustainability
    By: Lindsay Lewis
  • KEE membrane application on a roof

    A Beginner’s Guide to Single-Ply Roofing Membranes

    While PVC and TPO appear extremely similar, the chemistry...
    Low-Slope Roofs
    By: Peter Gross
Manage My Account
  • Sign up for the Newsletter
  • Online Registration
  • Manage My Preferences
  • Registration Customer Service

More Videos

Sponsored Content

Sponsored Content is a special paid section where industry companies provide high quality, objective, non-commercial content around topics of interest to the Building Enclosure audience. All Sponsored Content is supplied by the advertising company and any opinions expressed in this article are those of the author and not necessarily reflect the views of Building Enclosure or its parent company, BNP Media. Interested in participating in our Sponsored Content section? Contact your local rep!

close
  • HITT Construction headquarters
    Sponsored byBuilding Composites® LLC

    Pushing the Envelope

  • 2 construction workers and a DEXcell panel
    Sponsored byDEXcell Roof Boards

    Designing Low-Slope Roofs for Resilience

  • Bell Bank headquarters in Fargo, North Dakota
    Sponsored bySto Corp.

    Drained and Back-Ventilated Rainscreens vs Pressurized-Equalized Rainscreens

Popular Stories

graphic shows white arrows pointing to the right on a light green background

A Breakdown of Air Leakage Testing in LEED v5 BD+C

graphic shows a building destoryed by tornados with information on the amount of torandos in 2026 in the US

Record-Breaking Tornado Activity in Illinois Signals New Challenges for Architects

HITT Construction headquarters

Pushing the Envelope

Building Enclosure Newsletter

BE Poll

Events

April 9, 2026

Strategies for High-Performance Below-Grade Waterproofing

Credits: 1 AIA LU/HSW ; 1 IIBEC CEH; 0.1 IACET CEU

On-Demand Designing a high-performance building enclosure requires more than just surface-level protection; it demands a rigorous, performance-based mastery of below-grade water and gas mitigation. This discussion will provide an expert-level analysis of below-grade waterproofing within the comprehensive framework of the high-performance building enclosure.

April 28, 2026

Roof Design Considerations That Prevent Installation Failures and Change Orders

Credit: 1 AIA LU/HSW; 1 IIBEC CEH; 0.1 ICC CEU

On-Demand This course provides visual examples of actual field conditions. Some good, some not so good; along with design suggestions that can cut installation costs and reduce construction change orders. Upon completion of this course, you will have a better understanding of the requirements the roofing contractor must meet to provide the specified roofing system warranty, and long-term value to the owner.

View All Submit An Event

Products

Plaster and Drywall Assemblies Manual

Plaster and Drywall Assemblies Manual

This is a comprehensive manual that goes beyond codes and standards, providing expert guidance in design, detailing, material selection and troubleshooting for plaster and drywall.

See More Products

Related Articles

  • Roofing Detail for Stucco Wall

    Roofing Detail: Counterflashing at Steel-Framed, Stucco Wall

    See More
  • Roofing Detail: Skylight or Smoke Hatch with Integral Flashing

    Roofing Detail: Skylight or Smoke Hatch with Integral Flashing

    See More
  • Roofing Details

    Roofing Detail: Coping-to-Wall Termination

    See More
×

Enhance your expertise with unparalleled insights.

Join thousands of building professionals today. Shouldn’t you know what they know?

SUBSCRIBE TODAY!
  • RESOURCES
    • Advertise
    • Contact Us
    • Store
    • Want More
  • SIGN UP TODAY
    • Create Account
    • Newsletter
    • Customer Service
    • Manage Preferences
  • SERVICES
    • Marketing Services
    • Reprints
    • Market Research
    • List Rental
    • Survey/Respondent Access
  • STAY CONNECTED
    • LinkedIn
    • Facebook
    • Instagram
    • YouTube
    • X
  • PRIVACY
    • PRIVACY POLICY
    • TERMS & CONDITIONS
    • DO NOT SELL MY PERSONAL INFORMATION
    • PRIVACY REQUEST
    • ACCESSIBILITY

Copyright ©2026. All Rights Reserved BNP Media, Inc. and BNP Media II, LLC.

Design, CMS, Hosting & Web Development :: ePublishing