Facade Restoration is an Important Consideration of Any Redevelopment Project
Refurbishing an Oakland Icon
All images courtesy of SGH.
As the world's 20th-century curtainwall-clad building stock ages, building owners and restoration professionals are facing a new set of challenges distinctly different from those in other historic construction types. With questions of coating compatibility, sealing strategies, abatement procedures, and maintainability not seen in framed walls or masonry facades, the task of refurbishing these structures is a rapidly developing field in restoration technology. In this article, we present a case study of the 1221 Broadway office tower, an Oakland icon constructed in 1976. We explore the challenges encountered by the unique metal panel curtain wall architecture and materials used at the time of original construction, which presented a 45-year-old streaking problem that plagued the building's windows. The solutions developed for the refurbishment of this project also provide a potential roadmap for designers refurbishing similar aging curtain wall assets.
Background
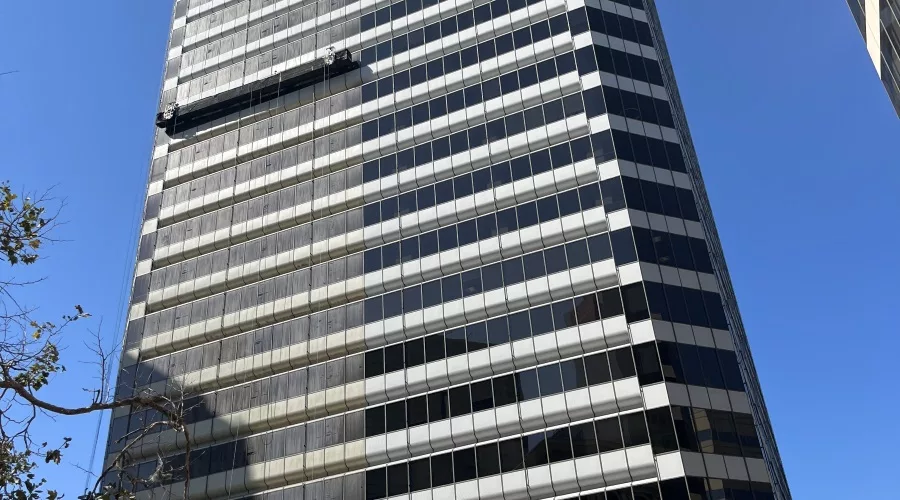
1221 Broadway is a 24-story Class A office tower clad in an aluminum-framed curtain wall with corrugated metal panel spandrels and ribbon windows. The building has panoramic views, offers direct access to public transportation, and sits atop City Center Plaza in the heart of downtown Oakland, Calif. When the current owner purchased the building, its facade suffered from age-related coating issues and, most notably, a pervasive glass streaking phenomenon, which the building had struggled with since its construction. After each window washing, the curtain wall glass would rapidly develop light gray streaks of soil deposits stemming from the spandrels above. The streaking impacted the occupants' views and left the exterior of the building with an unsightly appearance to passers-by.
As part of their planned renovation, the owner identified the streaking as a major issue impacting the building's curbside appeal, tenant satisfaction, and leasing potential. The issue was inconsistent with Class A building standards, so the owner aimed to remedy this facade shortcoming to ensure that the asset quality was commensurate with its location. Thus, the owner engaged us, Simpson Gumpertz & Heger, a building enclosure design and consulting firm, to investigate and provide a solution.
Investigation
At the start of a curtainwall restoration project, it is critical to have an investigation phase. This includes a document review, site visit, interviews with building staff knowledgeable about the history of the curtain wall (e.g., leak history, maintenance timeframes, operation issues, etc.), and often includes testing for hazardous substances. We embarked on the project by investigating the building history and its current conditions, which yielded information on the nature of the streaking problem and the condition of the existing coatings.
We found that since the spandrel panels are textured and corrugated, they pick up ambient airborne particulates and soil faster than a smooth panel. Many are also deeply recessed, creating a sloped shelf at each floor line directly above the windows (Figure 1) and these shelves collect the airborne particulates even faster than the vertical surfaces. When water in the form of rain or morning condensation flows down the panels, it picks up the particulates. The grooves of the panels then concentrate the soiled runoff into rivulets, which flow down onto the glass, dry, and leave light gray streaks (Figure 2).
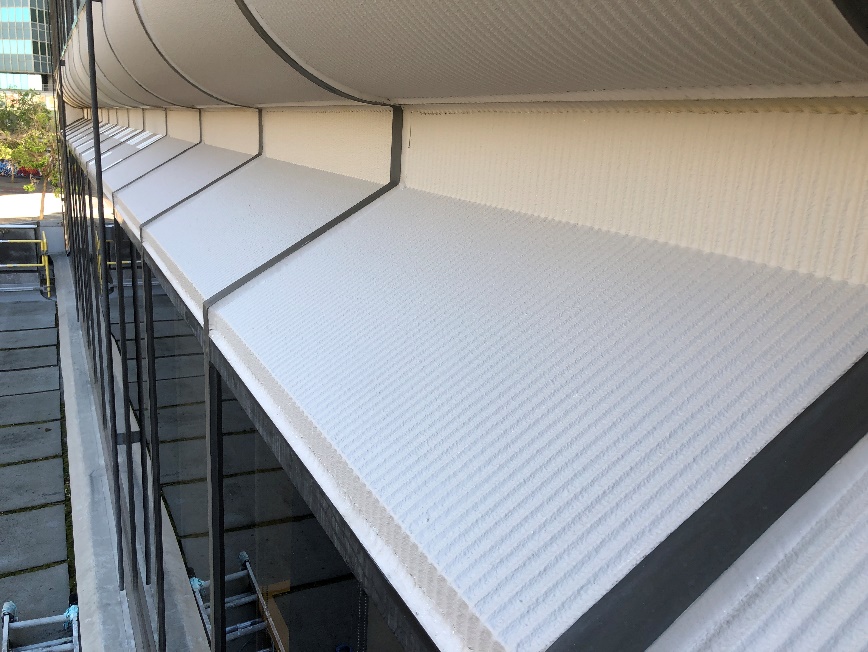
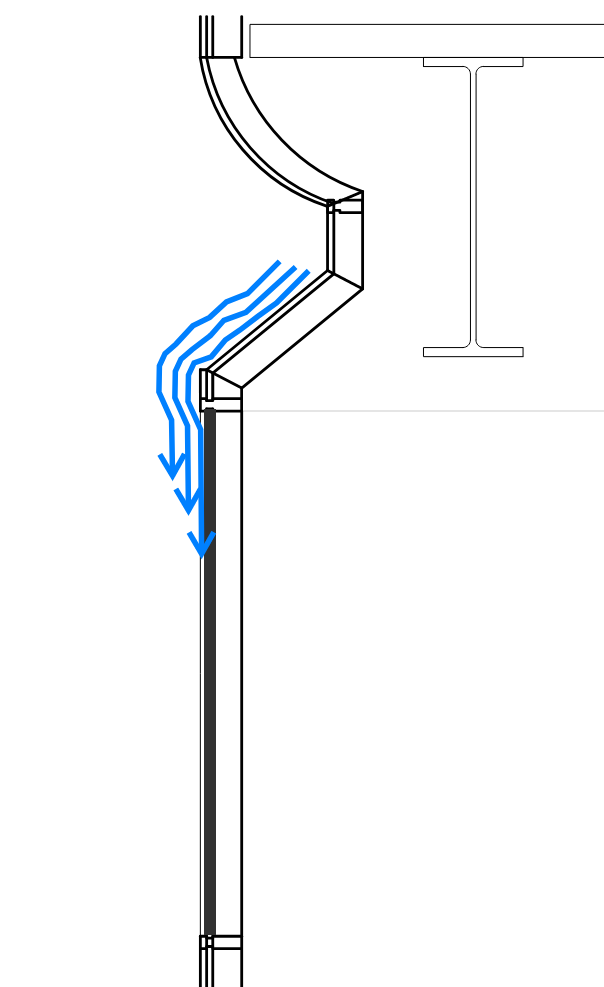
Figure 1: Panel Profile
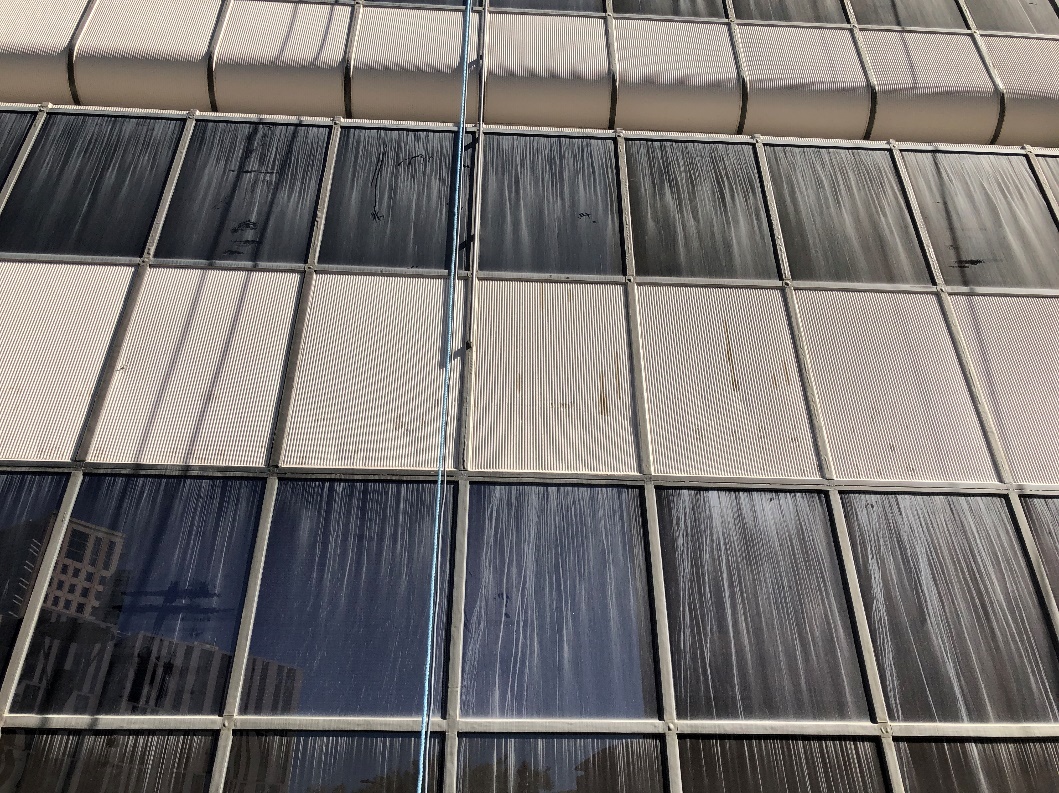
Figure 2: Streaking Phenomenon
Additionally, the panels already had two layers of coating. The first layer, which was from the original construction, used encapsulated particles and asbestos to create a textured surface. The second layer, an acrylic overcoat from the early 2000s, was stained, blistering, and chalking (adding chalky particulates, which contributed to the streaks) and had reached the end of its service life. Due to the asbestos-containing base coat, removing the existing coatings in their entirety to bare metal would be challenging and was not within the budget for the restoration. Thus, confirming if and how a second overcoat could be successfully achieved was a key goal for the project.
At the end of the investigation phase, initial repair concepts must be developed based on the owner's project goals. The owner had both long-term durability and low maintenance as primary project goals. With that in mind, we researched products and substrate preparation methods, engaged manufacturing partners, and identified design variables to be tested in a performance mockup phase.
Mockups
We planned a series of mockups to vet the efficacy of several repair concepts, working in close collaboration with ownership, manufacturers, and qualified contractors. Mockups allow validation of constructability, performance, and aesthetics for various design options and inform the development of the project specifications. Depending on the different unknowns of a project, multiple types of mockups may be needed.
Developing a written mockup protocol is the first critical step to a successful mockup phase. The protocol defines the sequence in which a mockup should be conducted, products and methods to be tested, and the evaluation criteria. It also serves as a draft specification to ensure that mockups are tightly controlled and executed in a reproducible manner. This project's mockup phase consisted of cleaning, recoating, and drip flashing mockups.
Cleaning Mockup
The role of a cleaning mockup is to confirm that the tools, chemicals, and methods permitted on the project are effective but do not damage the facade. Designers must determine what constitutes damage based on project-specific conditions and existing facade materials. Some cleaning methods can discolor or scratch existing finishes. For example, some cladding finishes can be sensitive to discoloration by acidic cleaners (Figure 3) and metals or glossy finishes are often adversely affected by abrasive cleaners or hard-bristled brushes. Other issues to consider are sealant damage or glass etching.
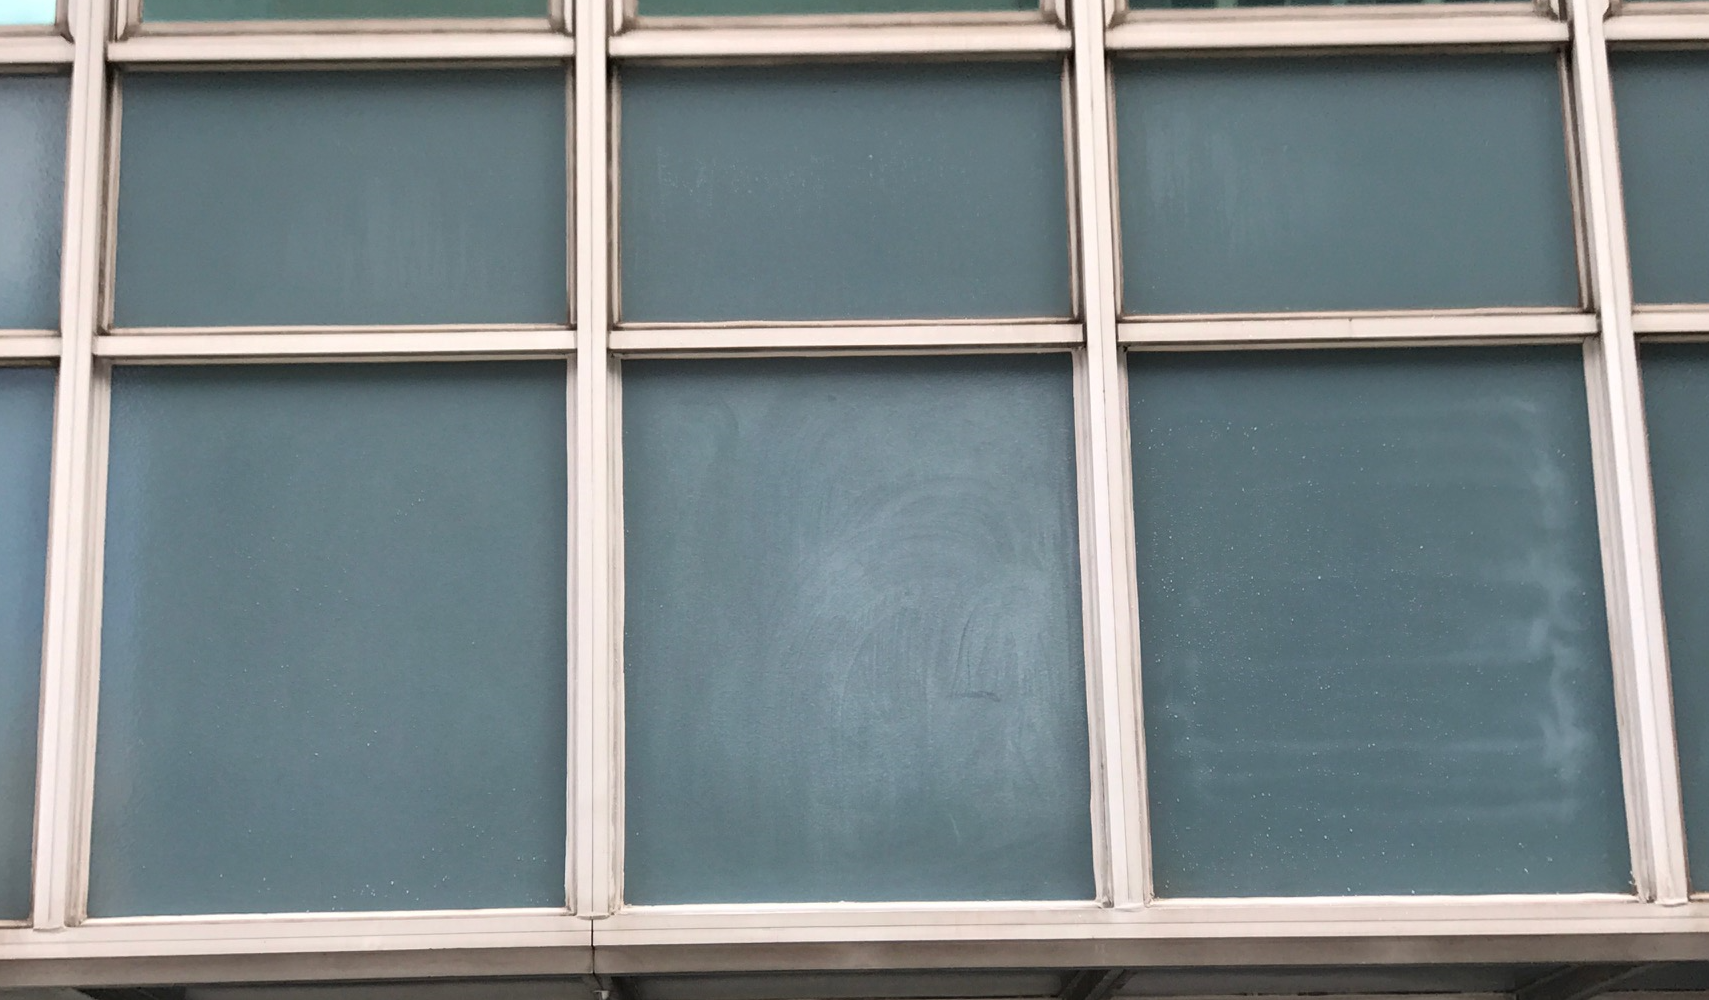
Figure 3: Example of Acid Etching and Abrasion to a Porcelain Enamel Finish
For this project, it was important to confirm that cleaning would not disturb the original asbestos-containing base coat. As part of this effort, the owner retained an environmental health consultant to review the asbestos-containing material and proposed project scope. This consultant provided a protocol for safely working over these hazardous materials and specifications for the removal and disposal of peeling and blistered existing coating areas to prepare the substrate for recoating.
For recoating projects, cleaning effectiveness can determine how successful new coatings will perform. Incomplete cleaning can prevent adhesion and lead to premature coating failure, so means of objectively measuring cleaning effectiveness are essential. On 1221 Broadway, we evaluated the results of the cleaning with visual observation, rag wipes, and new coating test patches (Figure 4) with adhesion test tape pulls. The mockup tested a variety of cleaning variables, as summarized in Table 1. After eliminating methods found to cause possible damage to the curtain wall materials or be ineffective, we determined the final cleaning procedure based on the evaluation results and on feedback from the contractor about ease‑of‑each cleaning method.
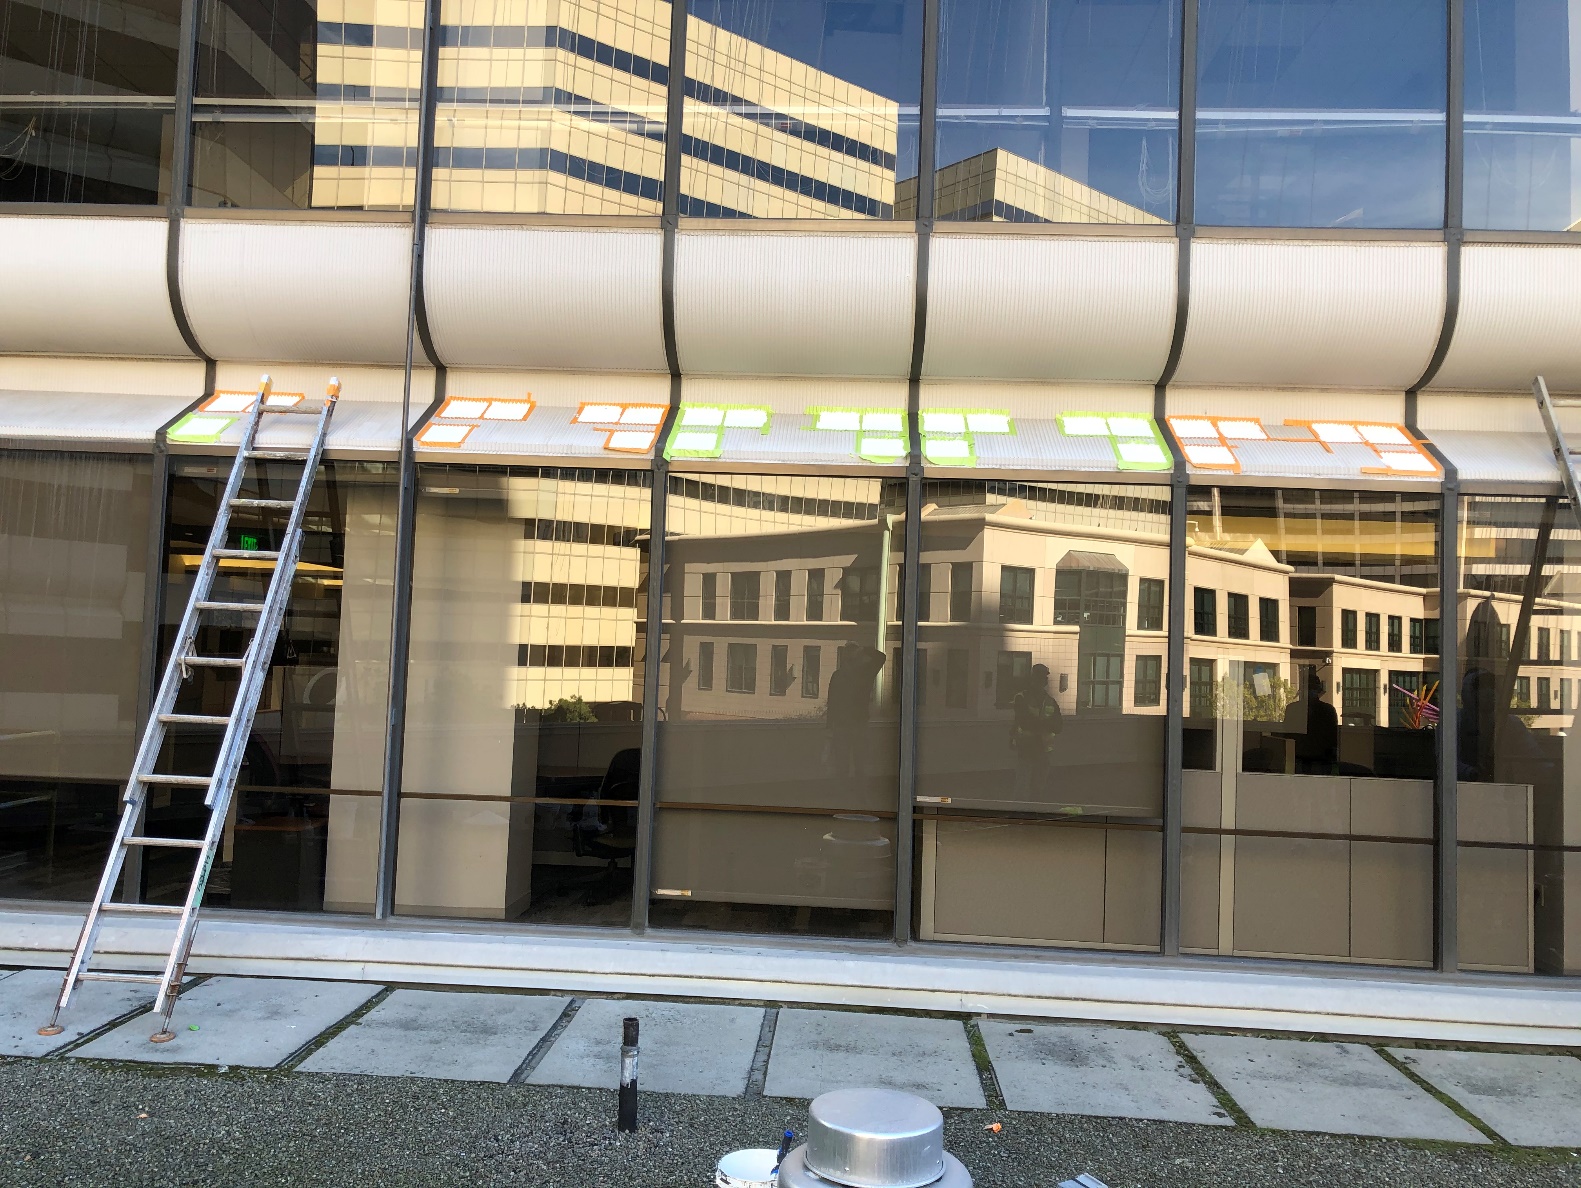
Figure 4: Three coating test patches installed over each cleaning method mockup

The cleaning mockup also shed light on the suitability of each method as a long-term cleaning solution. This was meant to inform a future building cleaning plan as a means of managing the streaks in the event that the streaking could not be entirely eliminated.
Recoating Mockup
A recoating mockup is typically meant to confirm panel surface preparation (though for this project, surface preparation was validated by the cleaning mockup, Figure 4), coating application requirements, adhesion, aesthetics, and maintainability. Coatings become weaker as the number of overcoats increases given that the top coat is supported not by a rigid substrate, but by multiple intermediate layers of material of varying flexibility and adhesion integrity. Additionally, shrinkage of the new coating as it cures can impart stress on the existing coatings. Thus, mockups are critical when determining whether a building can accommodate additional overcoats. When testing an installation over existing coatings or other less understood substrates, the schedule should accommodate a waiting period between installation and observation since adhesion issues may not be immediately apparent. For this project, we performed a three-month re-evaluation of the cleaning and recoating mockups to document long-term changes to adhesion, cleanliness, and window streaking.
We tested six different coating types in the recoating mockup (Table 1). These included acrylic, polyurethane, fluoropolymer, and newer technologies, such as a self-cleaning acrylic coating.
To check coating adhesion, we used ASTM D3359 Procedure A, which involves making an X‑cut in the coating before adhering and pulling a strip of standardized tape from the cut area. The amount of coating removed by the tape pull is then observed and rated on a scale of 0 (no adhesion) to 5 (excellent adhesion) (Figure 5). We compared tests from ten days after coating application to tests conducted three months later to check for changes in adhesion. This test was vital for identifying adhesion issues in one coating that promised a primerless application but was found to be extremely sensitive to substrate preparation. It also allowed us to assess the integrity of the two existing coating layers both at known peeling and blistered areas and at intact locations, which showed that the existing coatings were largely sound and intact in the area of the mockup. During the mockup phase, it is important to consider assessing the integrity of the existing panel coatings on a percentage sampling across all building elevations, as each elevation experiences different environmental elements, including sun exposure and weather, which can cause differential coating aging and deterioration.
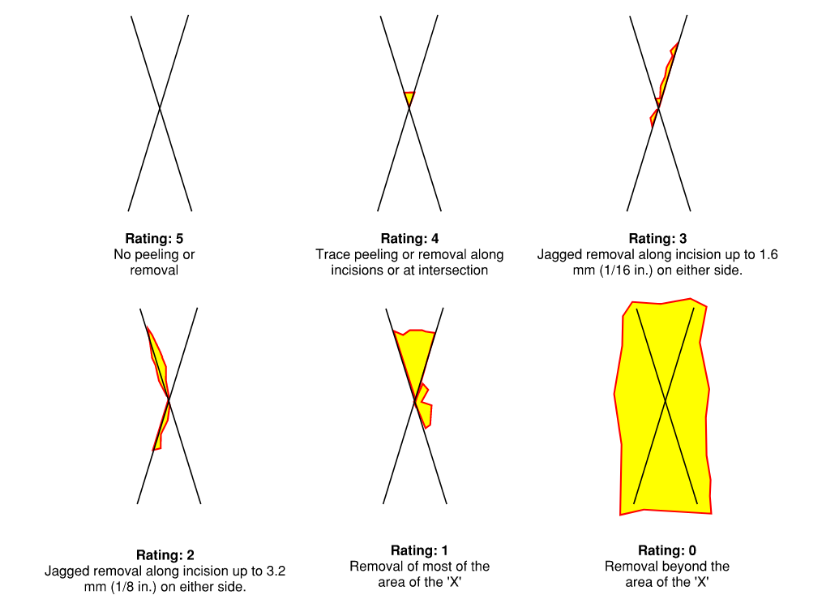
Figure 5: Adhesion Test Rating System; Adapted from ASTM D3359 Procedure A
We also assessed dirt pickup and the effect of the coatings on the glass streaking below. Results showed that glossier coatings captured fewer airborne particulates as compared to flat or matte coatings. However, after three months, we found that all windows below the recoated panels developed streaks regardless of the coating type.
Drip Flashing Mockup
While the recoating mockup allowed the project team to confirm that recoating with localized abatement was viable for the much-needed coating restoration, a solution to the streaking issue remained elusive. Realizing that keeping dirt off of the panels was not feasible, the project team took a different approach to keep the soiled runoff away from the glass: a drip flashing.
Drip flashings are facade elements designed to direct water runoff away from sensitive components below. Thus, attaching a thin sheet of color-matched aluminum with a hemmed outward kick to the mullions would direct soiled water off of the building and protect the glass below. However, a drip flashing mockup was necessary to select a design that would be effective in high‑wind conditions but still have minimal visual impact.
Mockups of three drip flashing designs (Figure 6) were installed at various points around the building and the glass was cleaned below and adjacent to the flashings. We then observed their performance over a period of several months during the rainy season. We determined that the medium and large flashings were highly effective at eliminating streaking around the building (Figure 7) and helped us identify that the largest flashing, though effective, created a conflict with the rails of the building's house window-washing rig. With this information, the project team was able to confidently select a drip flashing design, a crucial step given that the profile would be installed on over three lineal miles of curtain wall mullions. It also allowed the project team to demonstrate that the flashings would have minimal visual impact on the building.
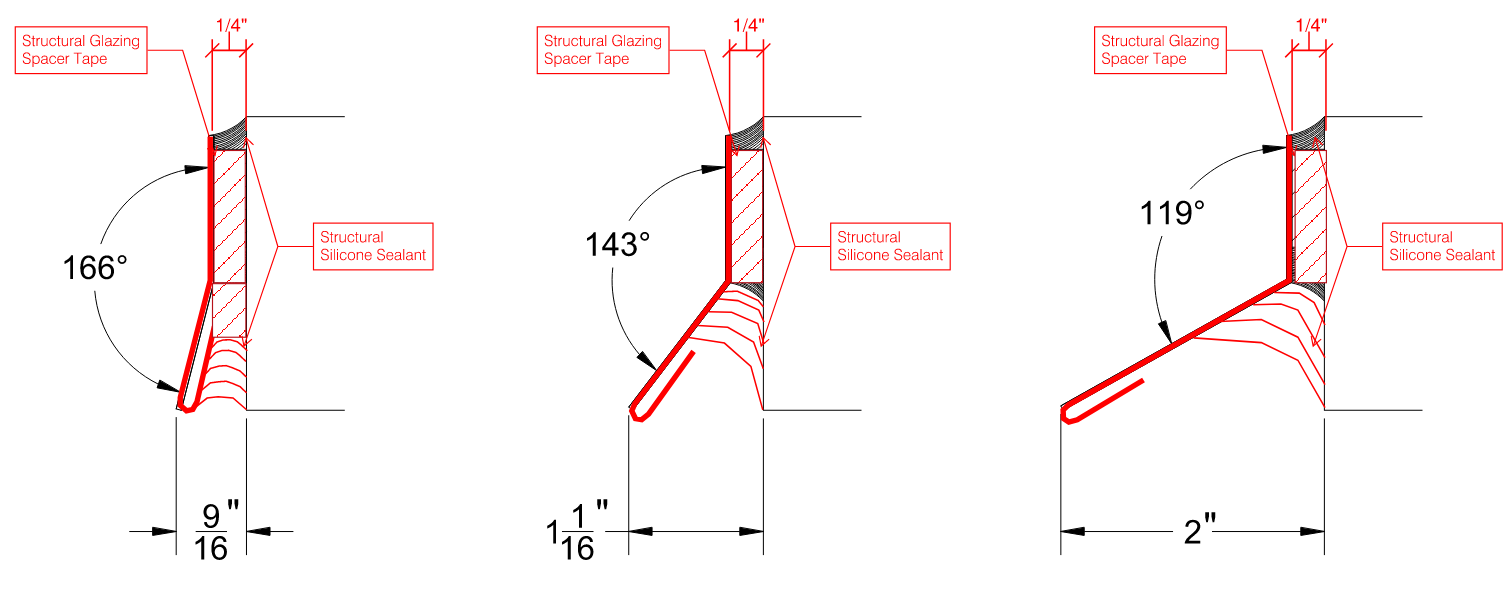
Figure 6: Drip Flashing Shop Drawings
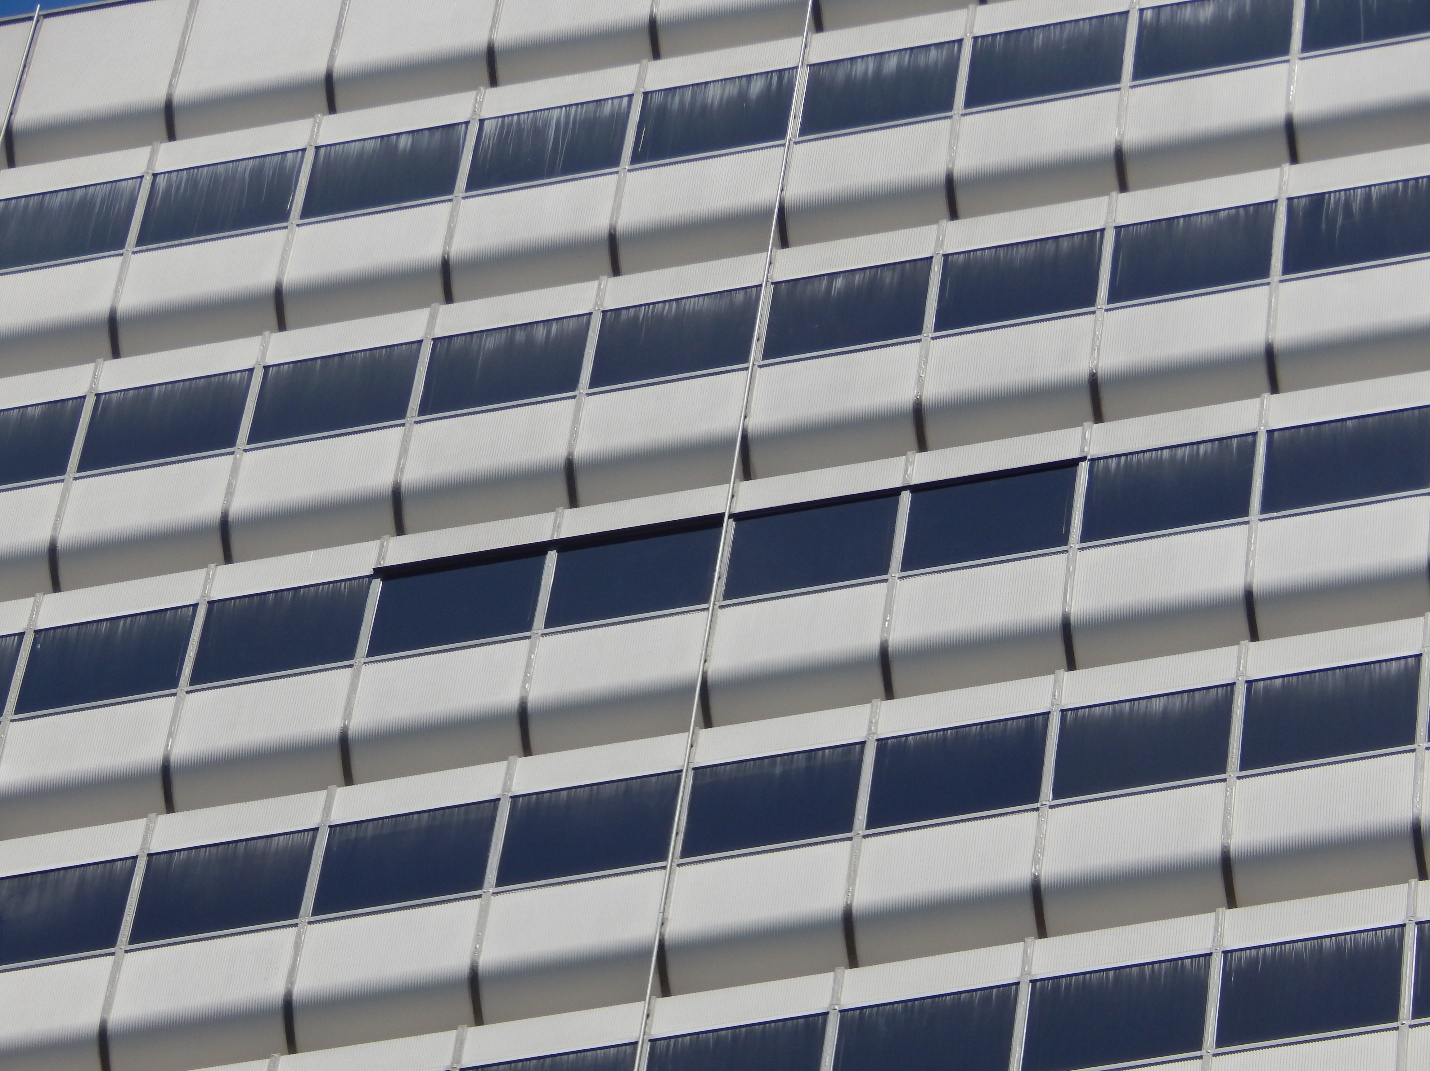
Figure 7: Glass at Level 22 drip flashing mockup 6 months after flashing installation.
To avoid fastening into the mullions and compromising their water tightness, the project used structural silicone to adhere the flashings to the curtain wall. This method is frequently used to adhere heavy IGUs to curtain wall and provided more than enough capacity to support lightweight aluminum drip flashings in a reliable, long-term manner.
In addition to the on-site mockups, to obtain a structural silicone twenty-year warranty, the installer was also tasked with submitting an appropriate sealant and primer along with laboratory test reports showing its long-term adhesion and durability. This was a critical step, since the results from this process confirmed that primer is necessary for adhesion of the submitted structural silicone to the fluoropolymer-coated (PVDF) drip flashing.
Other key considerations included calculations for wind-resistance, seismic movement, thermal expansion, corner detailing, and fabrication limitations, all of which were developed throughout the design and submittal phases using information gathered from the mockups, manufacturer, and installer.
Design & Construction
The mockups proved invaluable in confirming successful outcomes for the project and allowed for fast, efficient design and construction phases. Furthermore, the knowledge gained by the contractors during the mockups improved their planning, means and methods, and coordination, directly benefiting the global project with improved scheduling and reduced change orders.
Quality control during construction was also key to the project's success. We performed extensive observations of the substrate, completed coating, and completed flashing to verify compliance with the specifications. Fortunately, this allowed us to identify any issues early. In particular, the primary hurdles for the team to overcome were discovering existing coating areas in worse condition than anticipated and determining quality control procedures for panel abatement. However, collaboration between all parties and frequent up-close observation allowed the project team to address this issue.
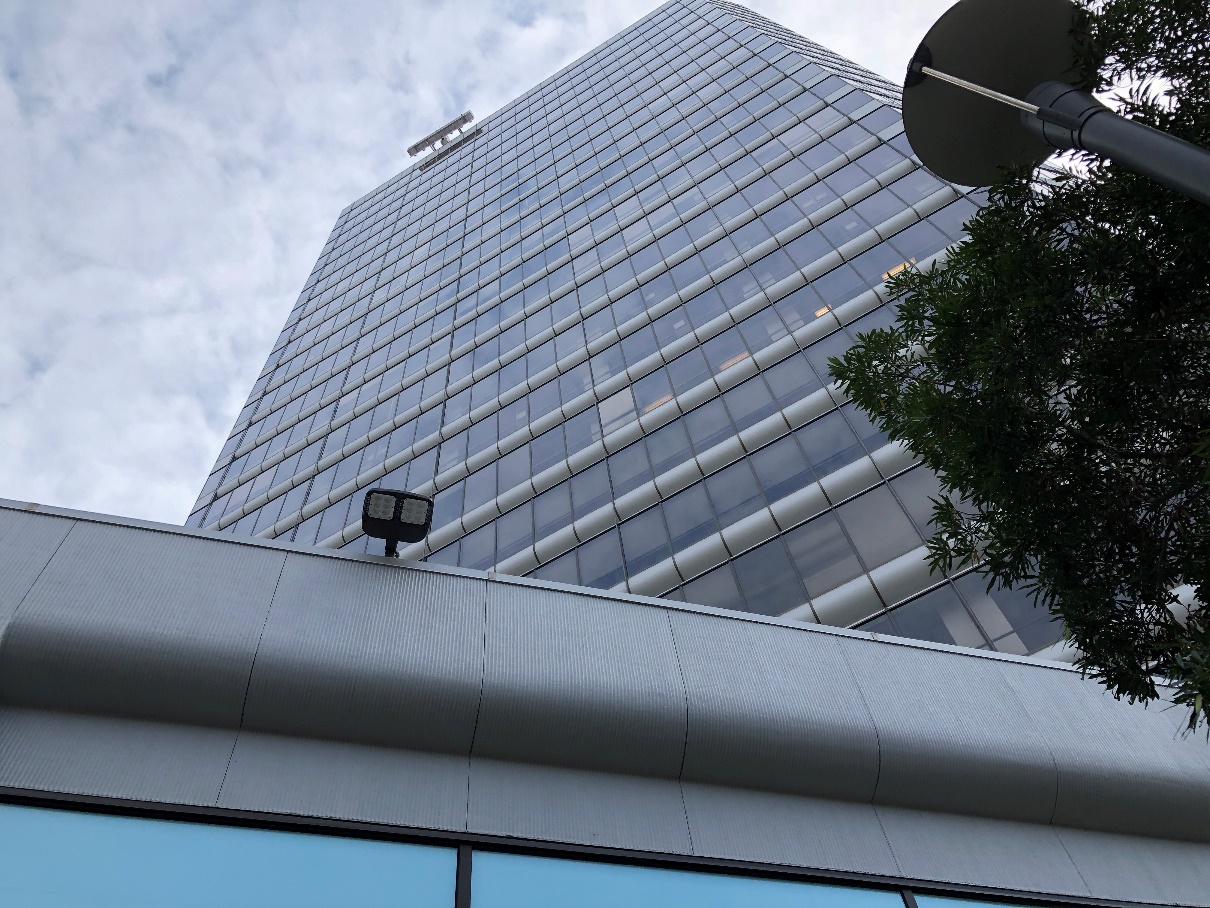
Figure 8: Completed Project
Conclusion
When asked how facade restoration provides value, the ownership representative of the developer overseeing the project, Adam Chall of TMG Partners, said "facade restoration is an important consideration of any redevelopment project. Oftentimes, capital expenditures in redevelopment business plans are focused on aging building systems or lobby renovations. We have found that a key part of bringing a building back to life relies on analyzing the ‘skin’. If improvements are possible, this work can aid greatly in bringing a building back to life."
Through a methodical approach to testing and implementing repairs, the project team achieved the owner's goals by restoring the building's coatings, resolving the streaking phenomenon with a simple elegant design, and providing an attractive and maintainable facade fitting for a Class A office building (Figure 8). In doing so, we addressed many of the emerging challenges in modern curtain wall restoration projects. To achieve similar project results, it is critical for owners, designers, and contractors to carefully review the unknowns of a project and establish their own roadmap for mockups, testing, and field QAQC to meet project-specific goals.
Looking for a reprint of this article?
From high-res PDFs to custom plaques, order your copy today!


.webp?height=740&t=1767036885&width=auto "Header - BE 1170x658 (002).png")

.webp?height=740&t=1755781744&width=auto "KEE(2).png")


