Waterproofing Design: Waterstops
Waterstops are typically applied at below-grade construction joints (horizontal or vertical) that are subjected to hydrostatic pressure. They are embedded into the concrete and span the length of the joint.
Waterstops are typically applied at below-grade construction joints (horizontal or vertical) that are subjected to hydrostatic pressure. They are embedded into the concrete and span the length of the joint. Waterstops should always be applied in negative side waterproofing applications, and they serve as a secondary barrier to prevent the passage of liquid water into the interior of the substrate in positive side applications.
Construction joints - or cold joints, as they are commonly referred to - occur when one section of the concrete is placed and cures before the adjacent concrete placement occurs. This frequently occurs in concrete structures at the following locations:
In addition to these circumstances, construction joints are recommended for installation in concrete every 30 feet.
 Waterstop Materials
Prior to design, it is important that the proper waterstop material and type is chosen. This will require some research for the designer because there are several different materials and types. Proper selection will contribute to the success of the project; improper selection may contribute to premature failure. The materials used to manufacture waterstops have evolved over the years from simple metal bars that spanned the joint to rubber dumbbells. Currently, waterstops are premanufactured joint fillers that are provided in numerous types, sizes and shapes. The most common materials used include:
PVC and neoprene rubber materials are very rugged and durable. The disadvantage with these materials is that installation can be difficult, making them susceptible to improper installation or damage during construction. Thermoplastic rubber is available in many different shapes, but the material has a tendency to fold over during concrete placement. There are eight basic types of waterstops that are formed from PVC or Rubber derivatives.
 They are as follows:
1. Ribbed flat.
2. Dumbbell.
3. Base seal.
4. Labyrinth.
5. Split waterstop.
6. Ribbed with center bulb.
7. Dumbbell with center bulb.
8. Tear web.
Ribbed flat and dumbbell waterstops are used for construction joints where there is little or no expected movement. The Ribbed flat type generally provides a better seal than the dumbbell shape.
The base seal waterstop is ideal for slab-on-grade joints or walls that are to be backfilled. These shapes are easy to form.
The labyrinth waterstop is primarily used in vertical joints where there is little or no expected movement. An advantage of this shape is that it does not require split forming and it adds a key to the joint. However, these types of waterstops are difficult to use in horizontal joints.
The split waterstop is available in ribbed with center bulb and dumbbell shapes. They eliminate the need for split form bulkhead.
Ribbed with center bulb waterstops are the most versatile type available. The center bulb accommodates lateral, transverse and shear movement. Larger center bulbs accommodate larger movements.
The dumbbell with center bulb accommodates lateral, transverse and shear movements. The ribbed shapes provide better sealing characteristics.
Tear bulbs accommodate large movements. Once joint movement occurs, the tear web ruptures, allowing the U-bulb to deform without putting the material in tension.
Hydrophilic materials are easy to install, but they are subject to damage from water (rain or other wetting) during construction. Bentonite and asphalt plastic waterstops are also easy to install, but they are not to be used on expansion joints and proper substrate preparation is required. In each case, these materials are adhered directly to the edge of the first concrete placement and application at the second pour is not required. The materials expand after water placement, allowing for filling of all voids in the joint for a watertight condition. As noted earlier, wetting of these materials during construction could create damage due to swelling that will occur. This requires the second concrete pour to be completed immediately after the first pour.
Butyl and bentonite/butyl bars have recently become popular waterstops. They have excellent durability and are easy to install. Other advantages include the elimination of on-site welding, easy visual inspection during installation, and stability during concrete pours. They are completely encapsulated in concrete.
 Waterstop Application
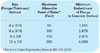
Waterstops are manufactured in different sizes and successful applications require that the proper size material is installed. The size of the waterstop is determined by the expected pressure of the water head. The head of water will also determine the minimum embedment of the waterstop flange into the concrete. It is best practice to provide the waterstop manufacturer with actual project joint design and water head conditions because all site conditions vary and they are best able to determine proper sizing for their products. The chart in Figure 3 provides the recommended waterstop size and flange embedment based on water head pressures.
The type of material that is used largely determines the application methods of the waterstop. For PVC, neoprene rubber or thermoplastic rubber, the waterstops are placed in the concrete formwork and tied down to position the material during concrete placement. It is extremely important that the securement of the waterstop is sound and that the material does not fold over during placement. Securement of the waterstop flange to both concrete placements is achieved by tying wires to the reinforcing steel every 12 inches on center. The wire should be tied to the first or second rib of the waterstop flange.
It is important that the center of waterstop bulb is positioned at the exact mid-point of the construction joint. This will ensure that the waterstop acts as an expansion joint during any structural movement. Heat welding of the material laps is required to achieve a proper fusion of the material. Lapping the material together without a proper heat weld will create openings susceptible to moisture infiltration. Most manufacturers offer prefabricated fittings for use at directional changes, which are recommended for use in these highly vulnerable areas.
The designer should specify that waterstops are installed in a continual pattern around all penetrations and structural steel columns that penetrate the concrete slab over the foundation. Continual applications at these vulnerable points will provide added protection against moisture entry.
Hydrophilic, bentonite and asphalt rubber waterstops are applied after the first concrete placement is completed. These rolled waterstop materials are to be applied to the concrete in accordance with the manufacturer’s adhesion requirements. In most cases, the material is nailed (or pinned) to the concrete to be held in place during the second pour. Some manufacturers require that the material is adhered to the substrate with a sealant.
Concrete cure is not required for application; however, proper concrete preparation is required. The concrete should be free of all contaminants, release agents, fins or other protrusions that could damage or puncture the waterstop material. The designer should specify who is responsible for concrete repair and what repair methods are deemed acceptable prior to construction. ASTM D 5295 is an excellent source for proper concrete repair methods and should be referenced in the design documents.
It is extremely important that these materials remain dry prior to the second concrete pour. Once wet, these materials swell to fill voids in the concrete. If the material swells prior to concrete placement it will lose its capacity to seal the joint after placement. If the second concrete pour will not be completed the same day, then proper covering of the applied waterstop is required.
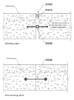
Figure 1. This detail shows waterstops installed at working and non-working joints.
Waterstops are typically applied at below-grade construction joints (horizontal or vertical) that are subjected to hydrostatic pressure. They are embedded into the concrete and span the length of the joint. Waterstops should always be applied in negative side waterproofing applications, and they serve as a secondary barrier to prevent the passage of liquid water into the interior of the substrate in positive side applications.
Construction joints - or cold joints, as they are commonly referred to - occur when one section of the concrete is placed and cures before the adjacent concrete placement occurs. This frequently occurs in concrete structures at the following locations:
- Transitions between horizontal and vertical components.
- When concrete placement is stopped, for schedule reasons or at the end of a workday.
- When design elements require a change in form design.
- When the formwork is insufficient to finish the structure in one placement, such as in the case of a long wall.
In addition to these circumstances, construction joints are recommended for installation in concrete every 30 feet.
Figure 2. This graphic illustrates proper placement of waterstops at construction joints. (Detail courtesy of J.P. Specialties Inc.)
Prior to design, it is important that the proper waterstop material and type is chosen. This will require some research for the designer because there are several different materials and types. Proper selection will contribute to the success of the project; improper selection may contribute to premature failure. The materials used to manufacture waterstops have evolved over the years from simple metal bars that spanned the joint to rubber dumbbells. Currently, waterstops are premanufactured joint fillers that are provided in numerous types, sizes and shapes. The most common materials used include:
- Polyvinyl chloride (PVC).
- Neoprene rubber.
- Thermoplastic rubber.
- Modified chlorophene.
- Bentonite clay.
- Asphalt plastic.
- Butyl and bentonite/butyl bars.
PVC and neoprene rubber materials are very rugged and durable. The disadvantage with these materials is that installation can be difficult, making them susceptible to improper installation or damage during construction. Thermoplastic rubber is available in many different shapes, but the material has a tendency to fold over during concrete placement. There are eight basic types of waterstops that are formed from PVC or Rubber derivatives.
Figure 3. Recommended waterstop size and flange
embedment.
1. Ribbed flat.
2. Dumbbell.
3. Base seal.
4. Labyrinth.
5. Split waterstop.
6. Ribbed with center bulb.
7. Dumbbell with center bulb.
8. Tear web.
Ribbed flat and dumbbell waterstops are used for construction joints where there is little or no expected movement. The Ribbed flat type generally provides a better seal than the dumbbell shape.
The base seal waterstop is ideal for slab-on-grade joints or walls that are to be backfilled. These shapes are easy to form.
The labyrinth waterstop is primarily used in vertical joints where there is little or no expected movement. An advantage of this shape is that it does not require split forming and it adds a key to the joint. However, these types of waterstops are difficult to use in horizontal joints.
The split waterstop is available in ribbed with center bulb and dumbbell shapes. They eliminate the need for split form bulkhead.
Ribbed with center bulb waterstops are the most versatile type available. The center bulb accommodates lateral, transverse and shear movement. Larger center bulbs accommodate larger movements.
The dumbbell with center bulb accommodates lateral, transverse and shear movements. The ribbed shapes provide better sealing characteristics.
Tear bulbs accommodate large movements. Once joint movement occurs, the tear web ruptures, allowing the U-bulb to deform without putting the material in tension.
Hydrophilic materials are easy to install, but they are subject to damage from water (rain or other wetting) during construction. Bentonite and asphalt plastic waterstops are also easy to install, but they are not to be used on expansion joints and proper substrate preparation is required. In each case, these materials are adhered directly to the edge of the first concrete placement and application at the second pour is not required. The materials expand after water placement, allowing for filling of all voids in the joint for a watertight condition. As noted earlier, wetting of these materials during construction could create damage due to swelling that will occur. This requires the second concrete pour to be completed immediately after the first pour.
Butyl and bentonite/butyl bars have recently become popular waterstops. They have excellent durability and are easy to install. Other advantages include the elimination of on-site welding, easy visual inspection during installation, and stability during concrete pours. They are completely encapsulated in concrete.
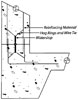
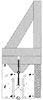
Figure 4. This detail shows the proper placement
of a waterstop for the first half of a concrete placement. (Detail courtesy of
J.P. Specialties Inc.)
Waterstops are manufactured in different sizes and successful applications require that the proper size material is installed. The size of the waterstop is determined by the expected pressure of the water head. The head of water will also determine the minimum embedment of the waterstop flange into the concrete. It is best practice to provide the waterstop manufacturer with actual project joint design and water head conditions because all site conditions vary and they are best able to determine proper sizing for their products. The chart in Figure 3 provides the recommended waterstop size and flange embedment based on water head pressures.
The type of material that is used largely determines the application methods of the waterstop. For PVC, neoprene rubber or thermoplastic rubber, the waterstops are placed in the concrete formwork and tied down to position the material during concrete placement. It is extremely important that the securement of the waterstop is sound and that the material does not fold over during placement. Securement of the waterstop flange to both concrete placements is achieved by tying wires to the reinforcing steel every 12 inches on center. The wire should be tied to the first or second rib of the waterstop flange.
It is important that the center of waterstop bulb is positioned at the exact mid-point of the construction joint. This will ensure that the waterstop acts as an expansion joint during any structural movement. Heat welding of the material laps is required to achieve a proper fusion of the material. Lapping the material together without a proper heat weld will create openings susceptible to moisture infiltration. Most manufacturers offer prefabricated fittings for use at directional changes, which are recommended for use in these highly vulnerable areas.
The designer should specify that waterstops are installed in a continual pattern around all penetrations and structural steel columns that penetrate the concrete slab over the foundation. Continual applications at these vulnerable points will provide added protection against moisture entry.
Hydrophilic, bentonite and asphalt rubber waterstops are applied after the first concrete placement is completed. These rolled waterstop materials are to be applied to the concrete in accordance with the manufacturer’s adhesion requirements. In most cases, the material is nailed (or pinned) to the concrete to be held in place during the second pour. Some manufacturers require that the material is adhered to the substrate with a sealant.
Concrete cure is not required for application; however, proper concrete preparation is required. The concrete should be free of all contaminants, release agents, fins or other protrusions that could damage or puncture the waterstop material. The designer should specify who is responsible for concrete repair and what repair methods are deemed acceptable prior to construction. ASTM D 5295 is an excellent source for proper concrete repair methods and should be referenced in the design documents.
It is extremely important that these materials remain dry prior to the second concrete pour. Once wet, these materials swell to fill voids in the concrete. If the material swells prior to concrete placement it will lose its capacity to seal the joint after placement. If the second concrete pour will not be completed the same day, then proper covering of the applied waterstop is required.
Looking for a reprint of this article?
From high-res PDFs to custom plaques, order your copy today!
.webp?height=740&t=1767036885&width=auto "Header - BE 1170x658 (002).png")

.webp?height=740&t=1755781744&width=auto "KEE(2).png")