Overcladding Strategies for Institutional Buildings
Renewing Existing Façades

Introduction
Building façades require upkeep and repair over time. These repairs can often be costly and disruptive to operations and occupants. Overcladding is one method that can be implemented to renew or upgrade the exterior façade while allowing the building to remain in full operation.
Overcladding is defined as covering an existing exterior wall system with a new cladding. There are many variations of overcladding but some common applications involve installing a new lighter-weight cladding system (e.g., EIFS, metal panels) outboard of an existing robust wall system (e.g., concrete, or mass masonry). There are other more complicated overcladding applications that include using heavier overcladding materials requiring additional design considerations. This article will later include a case study utilizing brick and limestone masonry to overclad an existing terra cotta wall.
Why Overclad?
As buildings age their performance and aesthetic can deteriorate without proper maintenance. Repair options typically consist of removing and replacing the façade/cladding, repairing the existing façade/cladding in place, or leaving the existing wall in place and overcladding the wall with a new cladding system.
One of the biggest overcladding benefits is the reduced disruption to the building occupants. Depending on project-specific details, it may not be necessary to relocate occupants that are close to exterior walls. There is also minimal disruption to electrical, mechanical, or IT wires/conduit that may exist along or within the exterior walls. This allows occupants to continue with their work or research without costly and time-consuming relocation. Installing a new façade over the existing also may eliminate or reduce the impact to hazardous materials within the existing wall, resulting in large cost and schedule savings by not handling or having to dispose of hazardous materials.
Performing in-place repairs is often the most economical option but lacks some benefits of overcladding. With overcladding, both the building performance and aesthetic can be substantially improved, such as improved air and water penetration resistance performance, by introducing a new dedicated air and water barrier. Thermal performance can also be improved by adding insulation into the new overclad wall system.
There are some drawbacks to overcladding when compared to the other typical repair options. By overcladding, the overall wall thickness increases, which may have negative effects on daylighting and visibility. It also increases the footprint of the building, which may be problematic with tight property lines. There are also challenging design and construction considerations that will be discussed in the following sections.
Enclosure Design Considerations
When designing an overclad wall, the building enclosure design considerations remain similar to designing a new façade, but now additional integration with the existing building enclosure components, such as the roof or fenestrations, must be carefully considered. When designing the enclosure, it is critical to keep the four barriers (Figure 2) in mind.
It is important to think about the reliability, durability, compatibility, constructability and continuity of these barriers, as these factors are essential in achieving expected performance goals.
Some unique envelope design considerations for overcladding (or any non-standard wall system) involve the location of the vapor retarder and insulation. It can be helpful to perform computer thermal and condensation modeling to assess the theoretical performance of the designed wall and its interaction with the existing wall.
Structural and Fire Safety Design Considerations
When overcladding, the new façade will induce new gravity loads and will move the plane of the lateral loads on the existing structure and/or façade. In addition to analyzing the loads, designers must also consider movements when designing connections since the new façade may deflect, and thermally expand/contract differently than the existing wall to remain.
In all overclad cases, the existing structure should be assessed as part of the overall project. The International Existing Building Code and the local building code should be referenced for the requirements that trigger full analysis. These requirements will vary for each project based on alteration levels, amount of loads exerted by the new overclad wall on the existing structure, or if there is a change in occupancy.
Fire safety design will be project dependent, based in jurisdiction, existing materials, new façade materials, and proximity to other buildings. NFPA 285 requirements may be triggered. We recommend consulting with a fire protection expert for each specific overcladding project.
Masonry Overclad Case Study Background
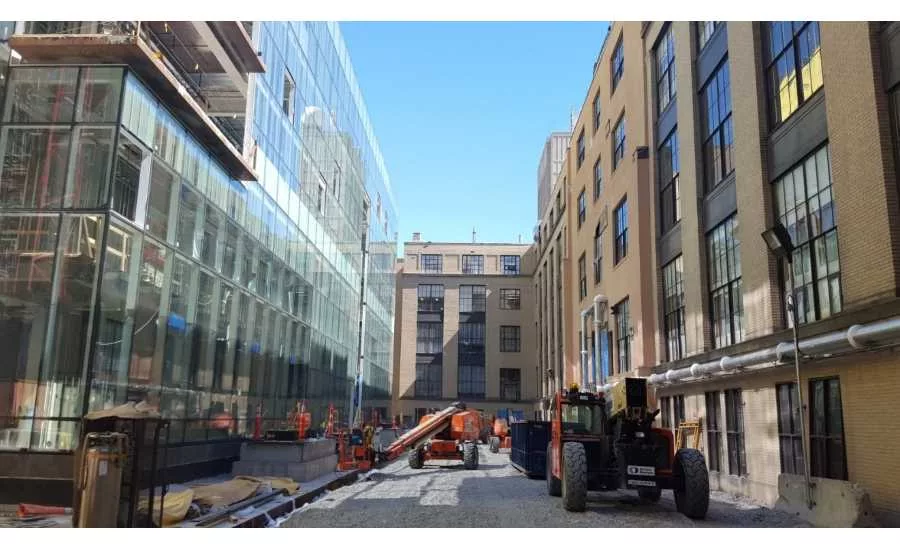
Simpson Gumpertz & Heger Inc. (SGH) was hired as the prime designer for a large historic façade restoration project at a university in the Greater Boston area (Figure 3). The existing buildings were constructed in the early 20th century. They are comprised of cast-in-place concrete structures and the exterior walls are composed of multiwythe brick masonry with limestone bands and windowsill features. The original windows were steel-framed with single-pane glazing.
The façades and windows had received minimal maintenance over their lifetime. The existing windows were corroded and performed poorly in water and air penetration resistance. The university was building a new high-profile building with exterior glass walls adjacent to these existing façades and tasked SGH with designing a full façade restoration project surrounding the new building. The scope included replacing the steel windows with new thermally broken aluminum windows and IGUs, rebuilding and structurally reinforcing the masonry parapets, restoring and repairing cast iron spandrel panels, replacing steel lintels, and miscellaneous masonry repairs and cleaning.
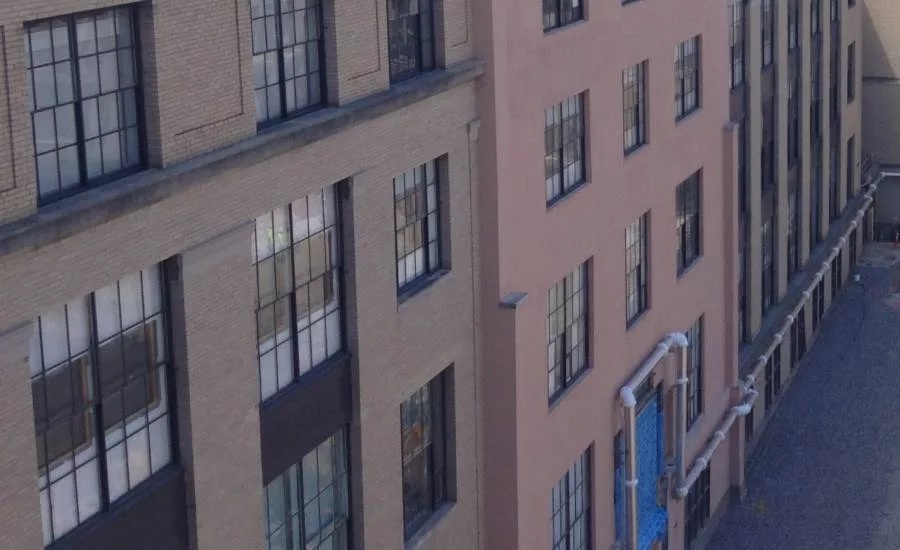
One portion of the façade within the restoration scope was originally designed to be a temporary wall, with plans to demolish the wall and add another wing as the university grew (Figure 4). This plan was never realized, and this temporary wall, built of mostly hollow terra cotta with a painted mortar parge coat, has remained in place. The university decided that the temporary wall should be turned into something more permanent with better performance and aesthetics.
The university decided that they wanted to maintain the historic nature of the façades to the greatest degree possible and chose the design of rebuilding the temporary wall to match the adjacent façades as much as practical. SGH originally designed the wall replacement with a concept to fully demolish the existing temporary wall down to the concrete-framed structure and to rebuild the wall with reinforced CMU backup and a brick masonry veneer.
Through the design process, the team noted that there would be significant impacts to the occupants with demolishing and fully rebuilding the temporary wall. There were multiple laboratory spaces with ongoing experiments/tests that could not be easily paused and relocated during demolition and construction. There were hazardous materials contained in the existing wall that would require abatement if the wall was demolished, and there were numerous HVAC components and equipment on the walls that would need to be relocated. The university asked whether we could develop another design with similar performance and aesthetic requirements but with less impact to the occupants.
Concept Design
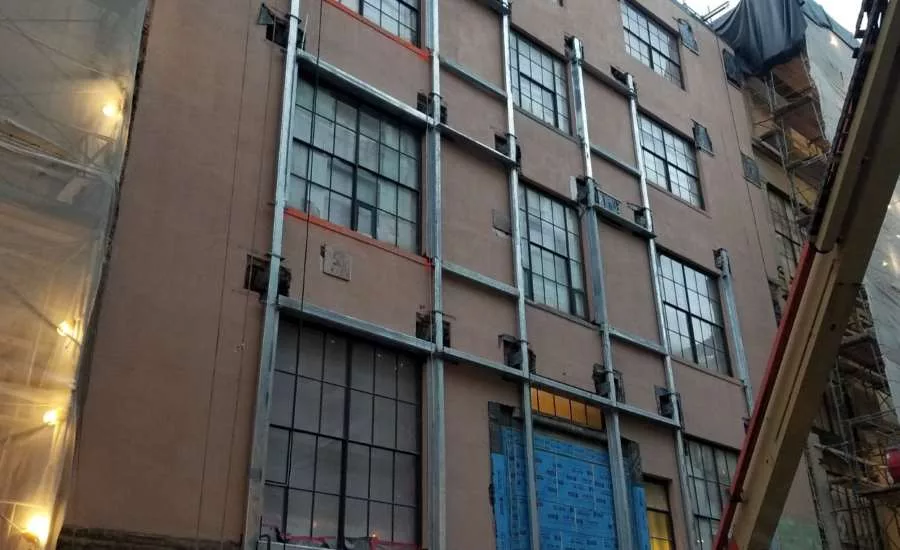
SGH found that overcladding the existing wall would meet the project goals within the client’s requirements. The new cladding material was to be a combination of brick and limestone masonry, which is heavier than more common overcladding materials. Because of this additional weight, a full structural analysis and design was required. SGH developed a design that utilized a new steel tube framing network installed outboard of the existing terra cotta wall with lateral connections that reached back through the wall to the base building’s concrete frame (Figure 5). SGH designed a new reinforced concrete foundation that was tied back to the existing base building foundation wall in order to support the gravity load of the new overclad façade.
Enclosure Design
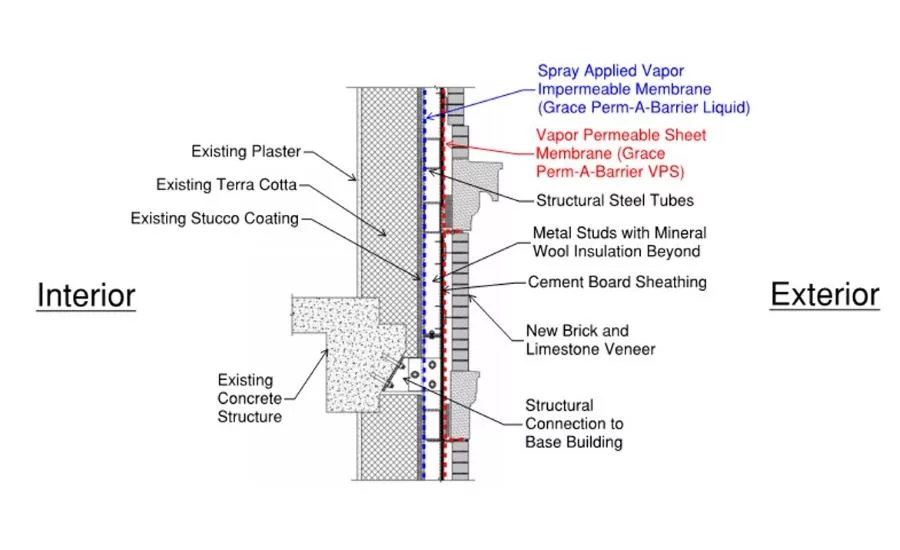
SGH performed computer modelling of multiple design options of the overclad wall system to evaluate its expected thermal performance and risk for condensation within the wall assembly. Through some design iteration we decided on a wall assembly as shown in Figure 6.
Coordination and Transition Detailing
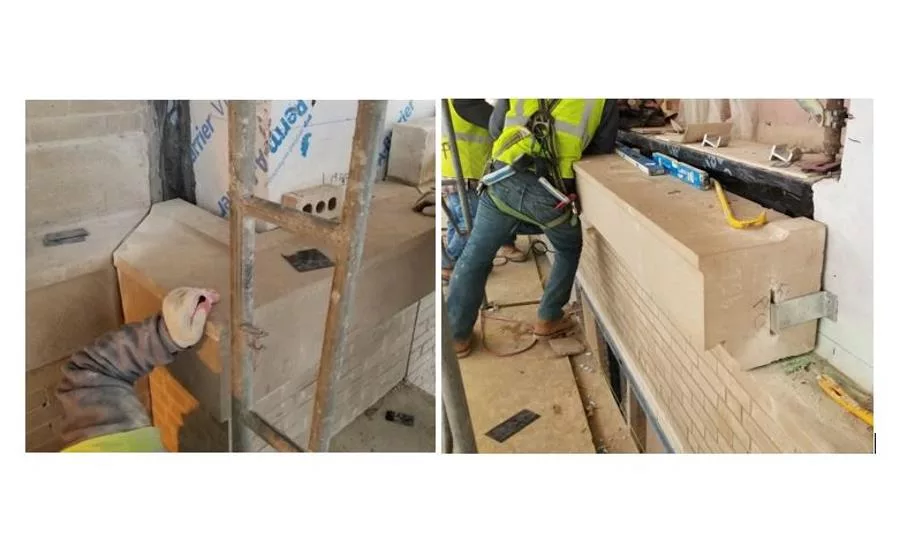
One of the most challenging aspects for constructing the overclad wall assembly was the coordination between the various trades working in a small area. There were steel erectors, stud and sheathing installers, waterproofers, masons, and glaziers that all had to be fully coordinated and had little room for construction tolerances between trades. We found it critical to create one master set of shop drawings that combined all shop drawings for the various trades in one coordinated set to ensure that installed items between trades aligned properly with each other (Figure 7).
Integration details between a new overclad wall assembly and surrounding existing conditions can be challenging and requires well-thought-out detailing. With this specific project, the windows needed to be installed with the same dimensional setback from the face of exterior brick to face of glass as the windows on the adjacent existing façades. This required us to install custom angles to transfer the wind load on the windows back to the new steel structure (Figure 8). SGH met with all parties to discuss tolerance needs, and we developed a connection detail between the steel angles at the jambs that could be field installed with up to 2 inches of adjustment. This structural angle connection also provided a good substrate to support the weather barrier as it wrapped the window opening.
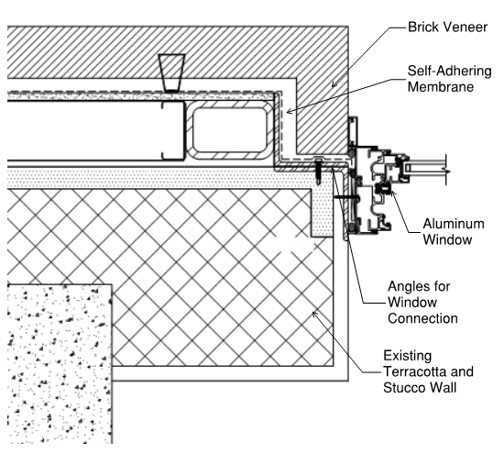
Figure 8 – Detail of window jamb within overclad wall.
Having a heavy presence on site during the overclad construction and requiring in-place mockups to be built for approval at numerous stages of the work were key elements during the construction phase. We encountered a handful of problems, mostly with alignments and dimensioning between trades, but we were able to quickly resolve these issues with the construction manager during mockups.
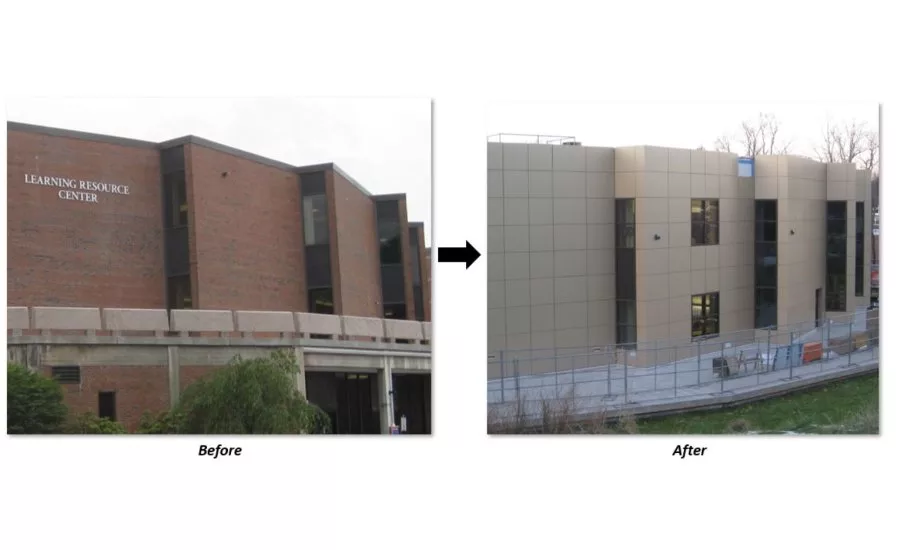
The overclad was successfully completed on schedule with the rest of the main façade restoration project. Occupants were able to operate throughout the project with only minor disturbances. The new overclad façade blended in well with the existing building (Figure 9).
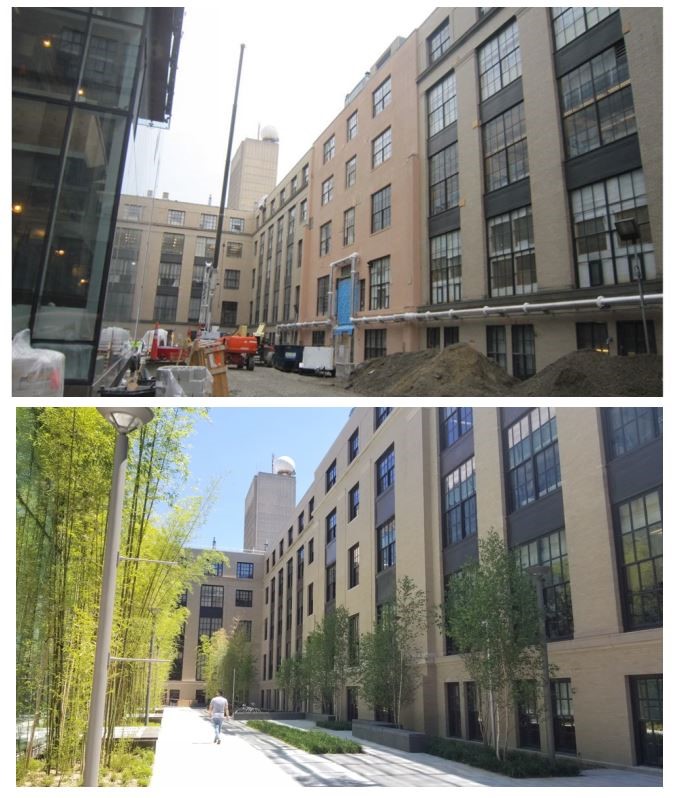
Figure 9 – Before and after photographs of the masonry overclad wall.
Takeaways
Overcladding can be a creative, cost-effective, and less disruptive alternative to fully rebuilding exterior walls. Overcladding can provide improved performance and aesthetics over common in-place repairs of old and tired façades. Thoughtful design and coordination are imperative when overcladding. Structural analysis must be considered, and structural design is commonly needed. The four barriers must be considered when overcladding an existing wall, and they must integrate with the existing surrounding conditions. Coordination, planning, and buy-in from contractors is key to a successful overcladding project.
This paper was originally presented at and published in the IIBEC Building Enclosure Symposium, Louisville, KY, November 11-12, 2019. Copyright, IIBEC, Inc. [https://rci-online.org] Republished with permission.
Looking for a reprint of this article?
From high-res PDFs to custom plaques, order your copy today!
.webp?height=740&t=1767036885&width=auto "Header - BE 1170x658 (002).png")

.webp?height=740&t=1755781744&width=auto "KEE(2).png")