Preventing and combating moisture damage to a structure is one of the oldest dilemmas in the building industry. Moisture intrusion can create problems both structural and aesthetic. As the industry has evolved, so have building codes and the materials utilized in helping reduce moisture intrusion.
WRBs—Purpose and Approved Materials
The International Building Code (IBC) requires the installation of a water resistive barrier (WRB) in all wall assemblies. WRBs are a type of specified material installed between the sheathing or studs and cladding, designed to help prevent water from reaching building components that could sustain extensive damage from moisture. Without a WRB, these components would be at greater risk of moisture damage.
There are several materials that have been identified as acceptable WRBs—asphalt felt, Grade D building paper, plastic house wraps, rigid foam insulation, liquid applied WRBs and certain types of sheathing panels. 1 Each has unique attributes, such as its level of vapor permeability, but only one is referenced in the building code—No. 15 asphalt felt.
The IBC specifies at least one layer of No. 15 asphalt felt that complies with ASTM D226 be applied to the sheathing or studs, but also states other “approved materials” can be utilized.2 In many instances, rigid foam insulation is one of the best choices due to its high moisture resistance and thermal performance, making it very suitable for energy-conscious builders and projects.3
Unlike batt, blown in or spray foam insulation, rigid foam insulations can be used to form a continuous insulation layer on the outside of the building. At the same time, this continuous insulation layer can protect the building from moisture. Of all the rigid foam options available on the market, polyisocyanurate (polyiso) has the highest R-value and has long been used as a WRB. Some continuous insulation solutions, such as mineral wool, cannot be used as approved WRBs.
How Polyiso can be Applied as a WRB
Polyiso insulation has been identified as an approved WRB in lieu of No. 15 asphalt felt, meeting the requirements of the IBC. With its high R-value and comprehensive range of thicknesses, compressive strengths and permeability options, polyiso is suitable as the WRB for many different commercial and residential applications.
In order for polyiso to be used as the WRB, it must be applied properly. Building code prescribes that alternative materials, regardless of their approval as a WRB, cannot interfere with the installation of other required materials.
Polyiso undergoes several different testing methods to ensure compliance. These include the AATCC water resistance test (conducted on polyiso material alone, as well as treated joints and the full assembly) and accelerated aging tests to gauge real-world exposure.3
With many WRB materials available, what exactly makes polyiso such a smart choice? Polyiso is able to fully cover wall studs, improving moisture control and reducing energy loss, and can be layered easily for enhanced R-value. In many cases, it also can come down to cost and labor efficiency. By being both a WRB and continuous insulation, it saves contractors a trip around the building. Additionally, polyiso provides the highest R-value per inch, allowing for thinner wall assemblies.
Installation Process
Once boards are installed per manufacturer’s instructions, the first and most important step in the installation process is selecting a durable and manufacturer approved joint treatment. The most common joint treatment is tape; however, others are available. Choosing proper tape can help prevent potential leaks that could lead to costly damage and repairs in the long run. It’s also important to gently clean the surface of the polyiso before application to remove any dirt or residue that can hinder proper adhesion of the tape.4
The tape should be applied to the seams in shingle fashion, working from the bottom of the assembly upward to help reduce moisture and air intrusion. To ensure correct lapping, tape horizontal seams first, then vertical. Tape should be wide enough to overlap outside corners and cover the fasteners by at least 1-inch in each direction. Once this process is complete and all joints are sealed, cladding can be installed.
Best Practices & Advantages
While the process for installing a polyiso WRB solution is fairly standard, there are some best practices that can help ensure the quality and longevity of the WRB. Moving the WRB outbound (or closer to the cladding) moves the drainage plane further from the interior, helping reduce the chance of moisture intrusion. For instance, in projects with a brick veneer, a layer of polyiso behind the veneer often is the best choice. 5 Installing the WRB closer to the cladding also helps with value engineering and labor savings, as less labor and materials are needed for the application. It also often improves building performance and reduces construction costs.
A polyiso WRB offers several other advantages as well. If desired, it often can function as a vapor barrier, helping reduce the diffusion of vapor through the wall assembly. Some polyiso products also have a dark facer for use in open joint rainscreen assemblies. The dark, non-reflective facer serves to black out the substrate.
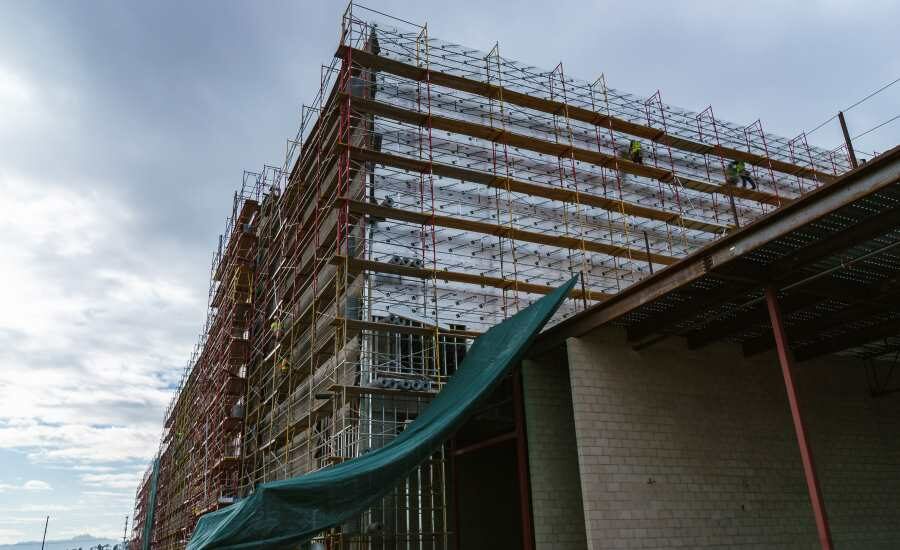
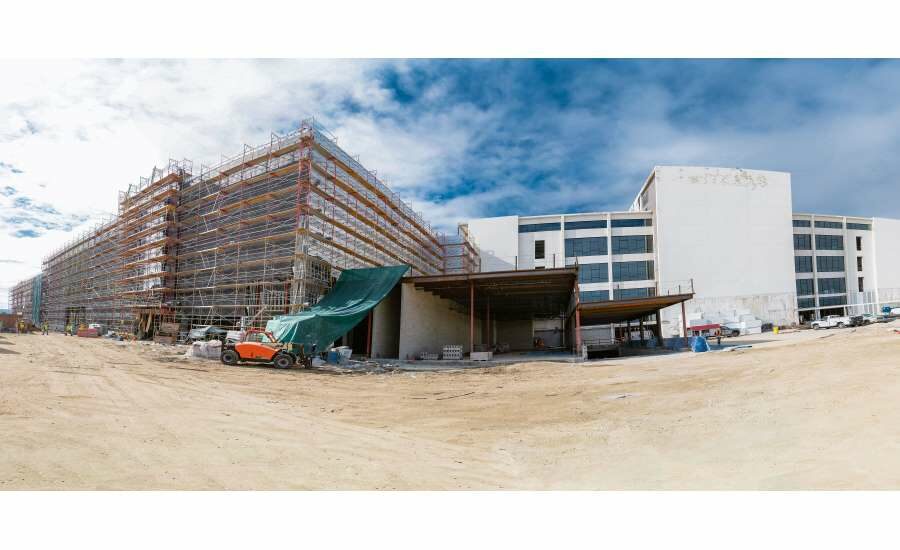
Real-World Application
Located in the North Hollywood area of Los Angeles, NoHo West is a new development featuring both residential and commercial space. This mixed-use development, formerly the site of a shopping center that sustained severe earthquake damage, has been constructed to adhere to California’s strict environmental building standards—one of which will take effect in 2020 requiring continuous insulation in all new constructions. The initial design called for continuous insulation, with the WRB membrane adhered to the face of the insulation. When budget and scheduling needs were evaluated, polyiso’s two-in-one function as insulation and weather barrier helped meet performance requirements and reduce cost.
To reduce labor costs and provide the wall assembly with better performance, the subcontractor made the decision to utilize polyiso as both the continuous insulation and WRB. A third-party conducted on-site testing as requested by the owner and validated that polyiso was an acceptable WRB for NoHo West. The high R-value of the polyiso coupled with fewer thermal breaks in the system will add to its energy efficiency and protect against moisture intrusion. As an added value, it also reduced the project’s material and labor costs and shortened the construction timeline.
Conclusion
As with any project, it’s important to evaluate the specific codes, standards and project needs before making a decision about the WRB material. In many cases, polyiso is a great choice that will serve as both the WRB and continuous insulation and provide additional environmental benefits.
References
1 https://www.greenbuildingadvisor.com/green-basics/water-resistive-barriers
2 https://codes.iccsafe.org/content/IBC2018/chapter-14-exterior-walls?site_type=public
3 https://www.drjbestpractices.org/installation-guide/polyiso-wrb
4 https://www.echotape.com/blog/pros-cons-rigid-foam-sheathing/


