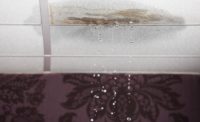
The primary function of a building is to exclude moisture intrusion from entering the interior surfaces; however, moisture intrusion is a common cause of building failures. Except for structural errors, approximately 90 percent of all building construction problems are associated with water in some way. Moisture intrusion can occur because of neglected maintenance, incorrect application of new building techniques or incorrect use of materials during new construction or restoration. Whatever the cause, moisture intrusion through leaks is a constant irritation to building owners and tenants.
This article provides an analysis of moisture intrusion in relation to exterior building components. It also provides proper methods of weatherproofing the building envelope.
The Physical Characteristics of Moisture
Water can be present in buildings in three forms:
- Solid (Ice)
- Liquid
- Gas (Water Vapor)
Solid (Ice)
Penetrating water may freeze in the winter creating ice that can have deteriorating effects on a building. The expansion of penetrating water when it freezes often causes deterioration of the saturated materials.
Liquid
Water can penetrate a building as a liquid in a number of forms:
- Rainwater or groundwater
- Result of defects or leaks in water systems
- Central heating
- Domestic appliances
Penetrating water often contains mineral salts that have originated from the ground or are derived from acid gasses in the atmosphere, such as:
- Carbon dioxide
- Alphorn dioxide
Additionally, penetrating water also frequently acts as a solvent for the mineral salts that are naturally present in most building materials. When the materials dry, salts come out of the solution and accumulate as crystals or dry salts. This phenomenon is commonly referred to as efflorescence. If salts accumulate in the pores of the material—unseen—they may cause:
- Erosion
- Flaking
- Deterioration of contaminated material due to swelling of material and force generated.
Gas (Water Vapor)
Water vapor is measured in buildings through humidity, which is the description of water vapor present in the air. Vapor is invisible unless the air contains so much water vapor that it becomes saturated. When saturation occurs, additional vapor is condensed as liquid water on any adjacent cold surface. Relative humidity is generally the amount of water vapor present in the air at any time (humidity) relative to the saturation level.
Human comfort level requires that the relative humidity in a building be in a range of 40 to 60 percent. Although most materials perform better when they are dry—this is not always probable. Materials must have tolerance within the comfort zone. Excessive dryness should be avoided. The relative humidity in a building should be under 70 percent or it could lead to:
- Unhealthy occupant conditions
- Mold growth
- Deterioration of interior fabrics and decorations
- Deterioration of building contents
Water exists and moves in several phases by many simultaneous transport mechanisms.
- As water vapor it moves by diffusion or convection.
- Diffusion takes place under the influence of a vapor concentration gradient.
- Convection involves the movement of water vapor with airflow.
- As liquid water it migrates by gravity, diffusion in porous materials, capillary. Porous hygroscopic materials also absorb moisture that can move within the material.
Moisture in buildings often moves because of a temperature gradient. Moisture flow and heat flow are closely interdependent. Heat is dissipated or released as moisture changes from one phase to another. Heat and moisture transfer coefficients often vary with moisture content and temperature.
Effect of Water on Different Building Materials
The effect of water is different on the various building envelope materials. Noticeable effects include:
- Dimensional changes
- Decay
- Mold and Mildew
- Premature deterioration
- Efflorescence
- Corrosion
- Disintegration of force materials
- Dislodging of stones
- Blistering of paint
Mechanisms of Water Penetration
The diagnosis of building envelope leaks concentrates on the physical mechanisms of water penetration. In all building envelope leaks there are three requirements, which must be present:
- The presence of water
- A hole
- A force to move the water
Water is inevitable, without water—in any form—there cannot be water infiltration. Holes, on the other hand, can be found at numerous points within the building envelope. Holes, cracks or openings can typically be found in the following locations:
- Joints between field construction elements and factory manufactured items such as windows
- Where there are excessive deflections
- Where there is differential settlement of the supporting structure warping
- Joints between materials having different coefficients of expansion
- Materials changing dimension due to moisture gain or loss
- Shrinkage as found in concrete
- Joint movement between elements such as concrete panels
- Bridges within the assembly may also provide a path for water to move from one component to another
There are four forces that can act independently or jointly to move water: gravity, capillary action, kinetic energy, and differential air pressure. The elimination of these forces is vital to the success rate of waterproofing the building envelope. The four forces can be controlled through proper design; the presence of water and holes cannot be avoided. The fact is that the building envelope will continually be exposed to the elements—wind rain, snow, hail and ice—therefore the presence of water cannot be eliminated.
Holes and openings in the building envelope are also certain due to the marriage of numerous building materials. Industry experts initially believed that sealants could be used to successfully integrate different materials and adequately waterproof the building envelope. This unrealistic reliance on sealants to seal or plug all building envelope holes has proved fallible. This was discovered in the developer-intensive ‘80s when light (and cheap) construction was the trend. A continual change in temperature promotes expansion and contraction because all materials have different expansion coefficients and therefore initiate different rates of movement. Repeated expansion and contraction eventually causes the failure of any sealant.
Removing the forces that cause water entry is a better alternative and one that should be pursued in design. Gravity is the first force, which acts on water, and it can be controlled in certain instances. Gravity’s force pulls bodies (in this case water) to the center of and object (the building). Therefore, the key to controlling gravity is to divert water away from the building interior. This can be accomplished in exterior walls by sloping the horizontal joints of precast panels to the outside. The flashings and weep holes in masonry constructions can be designed in similar manner.
Controlling gravity on roofs is a little more complicated; however, it can be accomplished. Obviously an imperfection in a sloped roof will be more forgiving than a hole in a flat roof due to the constant water run-off. However, achieving a 4/12 slope on an industrial facility that is 1 square mile in size is physically and economically impossible. A more realistic approach to controlling the forces of gravity on low-slope roofs is by accurate design and the use of proven 20-year-type roof materials and systems. Proper drainage is necessary to avoid prolonged ponding of water.
Water can move by capillary action because most building materials are porous, which means that each material has voids of smaller or larger complicated shapes whose volumes vary. This is particularly seen in masonry construction where water penetrates the masonry units and moves the soluble salts, which are deposited when the water evaporates—this is referred to as efflorescence. Capillary action contributes to expansion and contraction of materials, spalling of masonry units and loose mortar. Improving the bond between the mortar and the masonry units is effective in reducing this force.
Kinetic energy is the energy that is stored in a moving object, such as a rain drop that is either falling or being driven by the wind. The only way a moving raindrop can penetrate a building envelope construction is through an opening. This can easily be controlled by shielding or properly covering openings. Keeping rain out of the building should be the top priority in the design of the building envelope!
Differential air pressure occurs in most buildings. It occurs when air pressure is higher on one side of the wall than on the other. At this point water is automatically driven through any existing holes. Since holes are hard to eliminate in the building envelope construction this result is inevitable. The first step to solving this problem is to realize that it will occur. For instance, at window frames the outside gaskets are designed to deflect rain, however, weep holes are installed to drain out any water that may enter the assembly. Weep holes are also used in masonry construction in conjunction with proper flashing details to drain any water that enters the masonry units.
Cavity walls have been primarily designed to offset this force. In this construction, the outside cladding acts as a barrier to the rain and resists water penetration to the inside wall. The inside wall serves as the air barrier which resists air pressure from wind, stack effect and mechanical systems.
Weatherproofing the Building Envelope
Effectively stopping or controlling the ingress of moisture into a building can contribute to its extended service life. This can be accomplished through proper weatherproofing of the building envelope components.
Keeping moisture out of the interior of the facility is only one of the objectives of proper weatherproofing. Often times in the chaos associated with leaks this fact goes unnoticed. Obviously, preventing interior leaks is important in maintaining good owner-tenant relationships and preventing costly damage to interior spaces. However, preventing moisture intrusion from the interior spaces, while sacrificing the exterior components, could cause structural damage.
Exterior Wall Systems
The surge of new construction in the ‘80s brought on an influx of new building systems and materials designed to speed up the construction process. This has resulted in more diverse materials and complex building technology at exterior walls than at any other time in our history.
Metal and glass, stone, concrete and masonry are being combined in ways that offer rich architectural variety in color, texture and overall articulation of building exteriors. The marriage of these different materials has also presented a variety of concerns in regard to the overall weather integrity of these systems.
There are three basic design approaches to exterior wall construction; they are conventional masonry, panel systems and aluminum—framed systems. Each one of these systems will be discussed in regard to their weatherproofing ability.
Conventional Masonry
To properly weatherproof the building exterior it is important to remember that the intent must not only be to provide adequate means to limit moisture from entering the facility, but also there must be expedient removal procedures to prevent damage from moisture that enters the exterior building components. Unlike the roof system, most building exterior components cannot prevent moisture intrusion. This is in part due to the materials that are used and in part due to application of these materials. Masonry—which is commonly used for building exterior walls—is extremely permeable to moisture because the materials are porous, there are numerous joints, and construction is completed under many diverse conditions. Precast panels and aluminum curtain wall systems—which are used for exterior building construction—place an unrealistic reliance on sealants to weatherproof and join the components.
It is inevitable that moisture will enter exterior walls. Wind-driven rain can penetrate building walls through even small hairline cracks and openings. This is moisture that may or may not enter the facility. If moisture enters the facility it is often easy to detect through building leaks. Moisture that does not enter the facility can be just as detrimental and if there are no interior building leaks they can go undetected for long periods of time.
Building component damage caused by leaks can be severe. For instance, a leak in a roof system could delaminate the membrane, cause the loss of the insulation’s structural and thermal integrity and possibly deteriorate the roof deck. Repairs at roof leaks are automatic. Rarely will an owner elect to place buckets under roof leaks as long-term solutions.
This scenario should remain consistent with wall leaks. However, negative-side waterproofing is often employed under these circumstances and considered successful because the moisture does not enter the facility. A case in point: water has entered the facility through the masonry wall and the owner (with a recommendation from a consultant) has elected to hire a contractor to install a lead liner on the interior space. This solution will elevate moisture intrusion into the facility for a short time and it is economical, something I am sure was high on the owner’s list of tangible repairs; however, it does not solve the problem. Water is still entering the wall and it will eventually find another interior opening.
Furthermore, there could be considerable damage to the exterior wall in the process. In the winter, the water will freeze causing physical damage to the wall, spalling, cracking of masonry units and a loss of bond between the masonry units. In the summer, the trapped water could cause decomposition or disintegration and surface condensation. These could prove to necessitate costly repairs.
Although moisture penetration can be limited through good design and workmanship, it is virtually impossible to entirely prevent moisture from entering a masonry wall. Therefore, the elimination of the moisture that has entered the wall is the most effective solution in weatherproofing this type of building exterior component. Moisture elimination from masonry walls can be accomplished through the proper location of a combination of flashing and weep holes.
Without proper flashing, water that does penetrate the wall cannot be diverted back to the exterior. Continuous flashing should be installed at the bottom of the wall cavity and at any point where the cavity is interrupted by any elements such as shelf angles and lintels. Flashing should also be placed over all wall openings, at all windowsills, spandrels, caps, copings, and parapet walls.
Since the purpose of the flashing is to collect moisture and divert it to the outside, weep holes must be provided wherever flashing is used. The only exception to this rule would be at flashing that is installed directly underneath a coping. At this point, the purpose is not to collect water, but to prevent its entrance altogether. The weep holes should be located at the head joints directly above the flashing. They should generally be set every 24 inches-on-center at open joints and 16 inches-on-center at joints using wick material.
The tops and corners of a building have the greatest exposure to weather and it is at these points which masonry wall flashing design must be accurate. Even in a light rain, the top and corners of a building will get wet, when the walls may stay dry. Therefore, it is imperative that flashing be continuous around all corners and at the horizontal terminations, the flashing should be turned up to form an end dam.
The flashing should be installed so that water cannot flow behind it. This can be done by placing it in a mortar joint in the backing wythe or behind the sheathing. The flashing must also extend beyond the face of the masonry to prevent moisture that has collected on the surface from flowing around the edge and back into the wall.
There are several materials that can be used in masonry flashing. They include; sheet metal, rubber, bituminous membranes and composite materials. As is the case with all building components, the cost of these materials varies. However, based on the importance of their weatherproofing performance, it is recommended that the flashing materials be chosen with an emphasis on suitability over cost. Failure of these components could lead to significant damage, which is both difficult and expensive to repair.
Exterior building weatherproofing is cumbersome due to the joining of different materials and systems. Masonry walls are a prime example of the complexity of these components. Moisture must be allowed to enter and exit the material without causing damage to the material or structure, and it must be prevented from entering the interior of the facility. Proper details and a thorough investigation of the exterior building are important ingredients in the success of these components.
Panelized Wall Systems
Panelized wall systems are manufactured of steel or concrete (steel truss or precast panels) in panels that span from building column to column and form a beam upon which the window sits. Their attachment to the building structure is limited and the panel components are self-supporting. Panel lengths are generally between 20 to 30 feet.
The most critical weatherproofing element of these systems occurs at the numerous panel joints. In particular, the size of these joints between the panels is important because of the anticipated inter-story differential movements which occur on multi-story buildings, as well as thermal expansion and contraction of the exterior materials. The accumulated movement of panels which are 20 to 30 feet in length can be as much as 3/4 inches or greater. This must be accounted for in the initial design process.
Aluminum Framed Curtain Wall Systems
Aluminum framed curtain wall systems are the most lightweight of all exterior wall systems in use. Aluminum framing has good strength-to-weight ratio, which enables the design of wall systems that can be wholly supported off the slab edge. Like panelized wall systems, aluminum-framed curtain walls are easily attached to either steel or concrete structural frames. Because aluminum is easily extruded into complex shapes, it can be designed as inter-locking framing members to accommodate dynamic and thermal movement within the curtain wall system.
Construction Sealants
The weatherproofing of these wall systems relies on proper sealant application at the building joints. Building joints exist wherever two surfaces or materials come in contact. Construction sealants play an important role in the design and function of these joints. Weatherproofing sealants are required to maintain watertight joint seals even in the face of long-term exposure to the elements, including ultra-violet exposure, substrate thermal expansion, and building movement.
The criticism of these exterior wall systems has been largely due to their self-reliance on the performance of construction sealants. The successful long-term, trouble-free performance of the entire building exterior wall system depends largely on the quality of the joint seals.
The success of construction sealants is based on proper selection and use of the various sealant materials for a specific application. Specific sealant requirements can be divided into two simple areas. The first comprises universal properties necessary for a sealant to be effective and the second explains the process of proper sealant application.
There are three universal characteristics that a sealant must possess to be successful. They are:
- Adhesion
- Compatibility
- Durability
Adhesion
A sealant’s performance in any joint depends on the adhesion of the material to the joint wall. The bond of the sealant/adhesive to the substrate must be strong enough to withstand stresses well beyond those which the joint is designed to encounter.
The designer must be familiar with each material’s generic traits. Most sealants adhesion traits vary depending on the existing substrate. A basic understanding of the capabilities and limitations of different products helps streamline the specification process.
Another important attribute that aids proper adhesion is surface preparation. Most sealant manufacturers provide surface preparation instructions, particularly if primer is required. With all sealants, it is important that the surface is clean and dry prior to application. The sealant should be installed as soon as possible after cleaning the substrate, before the surface is contaminated with the dust and dirt from the job site. The best adhesion occurs when the sealant is applied and tooled to completely fill the recess provided in the joint.
Periodic field adhesion testing verifies that the substrates are being properly prepared and that the sealant is adhering as expected. The ASTM test—C 794—Test for Adhesion-Peel of Elastomeric Joint Sealants can be used to test for adhesion of a sealant/adhesive to the substrate. The test is performed by pulling a strip of wire mesh embedded in the cured sealant away from the substrate at a 180 degree angle and measuring force required to cause a failure.
Compatibility
Whenever different construction materials adjoin, compatibility is an issue. Different materials have different formulations. Signs of incompatibility range from slight discoloration of the white sealant to adhesion loss to the glass.
An understanding of sealant compatibility with generic substrates can help prevent material selection errors and related project delays. ASTM test C 1087—Test Method for Compatibility Determination of Liquid-Applied Sealants with Accessories used in Structural Glazing Techniques can be conducted to test chemical incompatibility. In this test the proposed gasket is placed on glass and the proposed sealant is applied on either side of it, white on one side and black on the other. After 21 days of exposure to ultra violet radiation at 118 degrees Fahrenheit, the sample is checked for sealant discoloration and adhesion loss.
At construction joints, the sealants must be compatible with the substrate, adjoining sealants and building components.
Durability
The sealant that is applied should maintain its performance characteristics throughout the life span of the wall system. A designer can obtain this type of information by checking a sealant’s historical data and investigating past projects where the sealant was applied. Accelerated aging tests can also be conducted in which sealant samples are subjected to ultraviolet radiation, water, and temperature cycles in compressed time frames.
Sealant Application
The sealant must have the ability to move with the adjacent building substrates while maintaining a watertight barrier. In application it is generally discovered that a thin bead of sealant will accommodate more movement than a thick bead. In joints where excessive movement is expected the building sealant should be no thicker than 1/2-inch and no thinner than 1/8-inch.
At typical building joints, the ratio of joint width to sealant depth should be a minimum of 2:1. At building expansion joints the designed joint should be at least twice the total anticipated joint movement. However, due to construction tolerances and material variations it is recommended that the joint design be four times the anticipated movement.
Preparation of the Joints
The joint must be thoroughly cleaned prior to any sealant application. This can be done by removing all foreign matter and contaminants such as grease, oil, dust, water, frost, surface dirt, old sealants and protective coatings.
Porous substrates can be cleaned by grinding; blast cleaning (sand or water) saw cutting or mechanical abrading. A combination of these cleaning methods can also be utilized. All dust and loose particles from these cleaning operations must be removed by vacuum or compressed air to leave a dry, clean surface for sealant application.
Metal, glass and plastic surfaces can be cleaned with mechanical or solvent procedures. Check the manufacturer’s latest printed specifications for the use of detergent or soap and water treatments they are generally not allowed as suitable cleaning methods. Solvents should be wiped off with clean, oil- and lint-free cloths.
Masking
All areas adjacent to the building joints should be masked prior to sealant application. This is to allow for neat sealant lines. Masking the adjoining surfaces also guards against sealant contact with any incompatible surfaces. Uncured sealants can leave a film on a surface that may change the aesthetic surface characteristics of the substrate. In some cases, the only method of sealant removal may be grinding or saw cutting. Generally these surfaces can be cleaned with special cleaning solvents.
The masking should be removed immediately following the tooling of the sealant.
Sealant Application
Install all backup material or joint filler prior to sealant application. Backer rods and joint filler material must be in accordance with the manufacturer’s latest printed specifications. Open-cell polyurethane foam or closed-cell polyethylene are the recommended backup materials for most joints. Polyethylene tape may be used for joints that are too shallow for backer rod.
The sealant should be applied in a continuous operation using positive pressure to properly fill and seal the joint. Tooling should be completed in a continuous stroke immediately after the sealant application prior to the formation of the sealant skin. The sealant should be tooled with light pressure to spread the material against the backup material and the joint surfaces.
The tool should have a concave profile to keep the sealant in the joint. Contrary to popular opinion, a finger is not the proper tool for sealant application